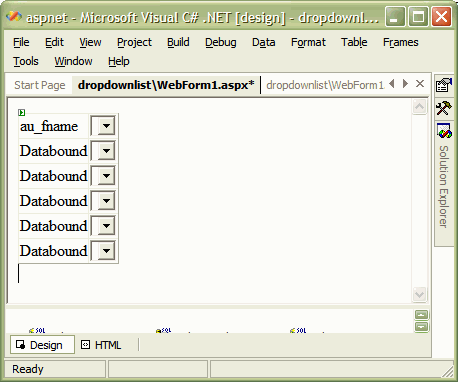
The following screen shot shows a web form in design mode. We are going to query the authors table in SQL Server’s pubs table. You can see we have one column (au_fname) to display the au_fname column from the table. In the second column we have added DropDownList controls to both the header line, and in each row with a data record.
Let’s first take a look at the ASPX markup to create the grid.
<asp:DataGrid
id="DataGrid1" runat="server"
AutoGenerateColumns="False"
OnItemDataBound="DataGrid1_ItemDataBound">
<Columns>
<asp:BoundColumn DataField="au_fname" HeaderText="au_fname" />
<asp:TemplateColumn>
<HeaderTemplate>
<asp:DropDownList
ID="HeaderDropDown" Runat="server"
AutoPostBack="True"
OnSelectedIndexChanged="DropDown_SelectedIndexChanged" />
</HeaderTemplate>
<ItemTemplate>
<asp:DropDownList
ID="ItemDropDown" Runat="server"
AutoPostBack="True"
OnSelectedIndexChanged="DropDown_SelectedIndexChanged" />
</ItemTemplate>
</asp:TemplateColumn>
</asp:DataGrid>
We have a DropDownList in the header declared as HeaderDropDown, and a DropDownList in the Item template declared as ItemDropDown. Notice we set the AutoPostBack property to true. Setting AutoPostBack to true allows the form to post back to the server and raise an event each time the user changes a selection in the DropDownList control. We also assign an event handler for the SelectedIndexChanged event. Notice we are sharing the same event handler (DropDown_SelectedIndexChanged) for all DropDownList controls. We will see later in the code how we can still identity the exact control firing the event.
Before we look at the SelectedIndexChanged event handlers, let’s think about populating the drop down controls with data for the user to select. When the DataGrid binds to a data source it will create a DropDownList control to place in the header row, and also a DropDownList for each row of data rendered. We need to catch when ASP.NET creates these controls so we can populate them with data for the user to select from. The best place to do this is during the ItemDataBound event. You can see in the ASPX above we are handling this event using the DataGrid1_ItemDataBound method, shown below.
protected void DataGrid1_ItemDataBound(object sender, DataGridItemEventArgs e)
{
if(e.Item.ItemType == ListItemType.AlternatingItem ||
e.Item.ItemType == ListItemType.Item)
{
string[] options = { "Option1", "Option2", "Option3" };
DropDownList list = (DropDownList)e.Item.FindControl("ItemDropDown");
list.DataSource = options;
list.DataBind();
}
else if(e.Item.ItemType == ListItemType.Header)
{
string[] options = { "OptionA", "OptionB", "OptionC" };
DropDownList list = (DropDownList)e.Item.FindControl("HeaderDropDown");
list.DataSource = options;
list.DataBind();
}
}
ItemDataBound occurs after a DataGridItem is bound to the grid. The event fires for each row, including the header and the footer rows. We know if the item belongs to the header, the footer, or one of the items by checking the Item.ItemType property of the event. Rows of data will always have a ListItemType of Item or AlternatingItem.
We use the FindControl method to obtain a reference to the DropDownList control for each row. To learn more about using FindControl in these scenarios, see ‘In Search Of ASP.NET Controls’. We specify the control to find by name. For the header remember we specified a name of “HeaderDropDown”, while rows with data will have a name of “ItemDropDown”.
We have an array of strings to represent data for the DropDownList control to bind against. Note that this event will fire for each row of the grid, so you’ll want to make sure this method performs well. You would not want to perform a database query each time the event fires. In this example, the DropDownList control in the header binds against a different set of strings than the DropDownList controls in the item rows.
Whenever the user modifies any of the DropDownList selections in our grid, the DropDown_SelectedIndexChanged event will fire. Remember, we assigned the same event handler for all of our lists, and we set the AutoPostBack property to true so a new selection should post back to the server and raise the event immediately. The event handler is shown below.
protected void DropDown_SelectedIndexChanged(object sender, EventArgs e)
{
DropDownList list = (DropDownList)sender;
TableCell cell = list.Parent as TableCell;
DataGridItem item = cell.Parent as DataGridItem;
int index = item.ItemIndex;
string content = item.Cells[0].Text;
Response.Write(
String.Format("Row {0} contains {1}", index, content)
);
}
First, notice the sender parameter will be the DropDownList control modified by the user. By casting the object reference to a DropDownList we get a reference to the modified control and can see what the user has selected.
Secondly, notice the DropDownList control’s parent will be a TableCell of the grid. The parent of the TableCell will be a DataGridItem. Once we have a reference to the DataGridItem, we can see which row was selected by using the ItemIndex property. (Note: ItemIndex will be -1 for the header row). With the DataGridItem we can also inspect the values of other cells in the row.
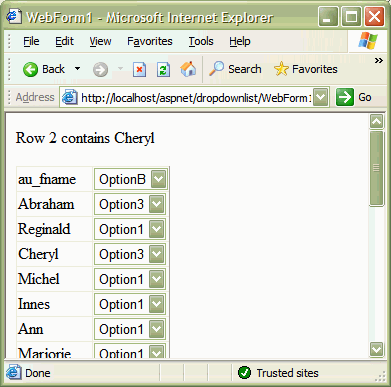
The following image shows the form in action just after we made a new selection to the list in Cheryl's row.
Once you know the control invoking the event you can find almost any other piece of information you need about the grid or the underlying data source by getting to the DataGridItem object and inspecting the ItemIndex property or the collection of TableCells. With this information in hand, adding controls to the rows of your DataGrid should become a straightforward process. You can download the code for this article. Add this code to an empty web project as an existing item.
Original POST at
No comments:
Post a Comment