#region Namespaces
using System;
using System.Data;
using System.Configuration;
using System.Linq;
using System.Web;
using System.Web.Security;
using System.Web.UI;
using System.Web.UI.HtmlControls;
using System.Web.UI.WebControls;
using System.Web.UI.WebControls.WebParts;
using System.Text;
#endregion
/// <summary&rt;
/// Summary description for GridViewPageFooter
/// </summary&rt;
public class GridViewPageFooter
{
public GridViewPageFooter()
{
//
// TODO: Add constructor logic here
//
}
public static void GetGridViewPager(GridView gv, GridViewRow gvr)
{
if ((PlaceHolder)gvr.FindControl("phPager") == null)
{
throw new ApplicationException("A placeholder with an ID=\"phPager\" is required for this to work");
}
PlaceHolder ph = (PlaceHolder)gvr.FindControl("phPager");
// html markup and style
StringBuilder sb = new StringBuilder();
sb.Append("<div style=\"float:left;\"&rt;");
sb.Append(string.Format("<span class=\"pagerCurrentPage\"&rt;Page: {0} of {1}</span&rt;", (gv.PageIndex + 1).ToString(), gv.PageCount));
Literal lit = new Literal();
lit.Text = sb.ToString();
ph.Controls.Add(lit);
//adding the table
//StringBuilder sbTable = new StringBuilder();
//sbTable.Append("width=\"100\" cellspacing=\"0\" cellpadding=\"0\" border=\"0\" align=\"left\"&rt;");
//sbTable.Append("
// Previous page button
ImageButton btnImage = new ImageButton();
btnImage.ID = "btnPrevPage";
btnImage.CommandName = "Page";
btnImage.CommandArgument = "Prev";
btnImage.ToolTip = "Previous Page";
//btnImage.ImageAlign = ImageAlign.Middle;
if (gv.PageIndex == 0)
{
btnImage.Enabled = false;
btnImage.ImageUrl = "~/Images/prev_icon.jpg";
}
else
{
btnImage.Enabled = true;
btnImage.ImageUrl = "~/Images/prev_icon.jpg";
//btnImage.OnClientClick = "GeneaSys.Common.addProgressText('Previous grid page...');";
btnImage.Click += new ImageClickEventHandler(btn_Click2);
}
ph.Controls.Add(btnImage);
// Pager page links
LinkButton lnb;
int numberOfPageLinks = gv.PagerSettings.PageButtonCount;
int startPage = (((gv.PageIndex) / numberOfPageLinks) * numberOfPageLinks) + 1;
if (startPage &rt; gv.PageCount - numberOfPageLinks && startPage &rt; numberOfPageLinks) startPage = (gv.PageCount - numberOfPageLinks) + 1;
for (int i = startPage; i < numberOfPageLinks + startPage && i <= gv.PageCount; i++)
{
if (i &rt; startPage)
{
lit = new Literal();
lit.Text = " <span class=\"pageSeperator\"&rt;|</span&rt; ";
ph.Controls.Add(lit);
}
else
{
lit = new Literal();
lit.Text = "<span class=\"pagerPageNumbers\"&rt;";
ph.Controls.Add(lit);
}
if (gv.PageIndex + 1 == i)
{
lit = new Literal();
lit.Text = i.ToString();
ph.Controls.Add(lit);
}
else
{
lnb = new LinkButton();
lnb.CommandName = "Page";
lnb.CommandArgument = i.ToString();
lnb.Text = i.ToString();
ph.Controls.Add(lnb);
}
}
lit = new Literal();
lit.Text = "</span&rt;";
ph.Controls.Add(lit);
// Next page button
btnImage = new ImageButton();
btnImage.ID = "btnNextPage";
btnImage.CommandName = "Page";
btnImage.CommandArgument = "Next";
btnImage.ToolTip = "Next Page";
//btnImage.ImageAlign = ImageAlign.Middle;
if (gv.PageIndex == gv.PageCount - 1)
{
btnImage.Enabled = false;
btnImage.ImageUrl = "~/images/next_icon.jpg";
}
else
{
btnImage.Enabled = true;
btnImage.ImageUrl = "~/Images/next_icon.jpg";
btnImage.Click += new ImageClickEventHandler(btn_Click1);
//btnImage.OnClientClick = "GeneaSys.Common.addProgressText('Next grid page...');";
}
ph.Controls.Add(btnImage);
lit = new Literal();
lit.Text = "<span class=\"EmptySpan\"&rt; </span&rt;";
ph.Controls.Add(lit);
lit = new Literal();
lit.Text = "<span class=\"EmptySpan\"&rt; </span&rt;";
ph.Controls.Add(lit);
lit = new Literal();
lit.Text = "<span style=\"width:600px;\"&rt; Go to page: ";
ph.Controls.Add(lit);
TextBox tb = new TextBox();
tb.ID = "txtGoToPage";
tb.ToolTip = "Enter the Page Number";
tb.Width = Unit.Pixel(30);
tb.CausesValidation = true;
tb.ValidationGroup = "GoToPage";
ph.Controls.Add(tb);
lit = new Literal();
lit.Text = "<span class=\"EmptySpan\"&rt; </span&rt;";
ph.Controls.Add(lit);
ImageButton btn = new ImageButton();
btn.ID = "btnGoToPage";
//btn.Text = "Go";
btn.ImageUrl = "~/Images/go_btn.gif";
btn.CausesValidation = true;
btn.ValidationGroup = "GoToPage";
btn.ToolTip = "Go To Page";
btn.Click += new ImageClickEventHandler(btn_Click);
//btn.OnClientClick = "GeneaSys.Common.addProgressText('Going to grid page...');";
ph.Controls.Add(btn);
RangeValidator rv = new RangeValidator();
rv.ID = "valPager";
rv.Type = ValidationDataType.Integer;
rv.MinimumValue = "1";
rv.MaximumValue = gv.PageCount.ToString();
rv.Text = "not a page";
rv.EnableClientScript = true;
rv.ValidationGroup = "GoToPage";
rv.ControlToValidate = "txtGoToPage";
rv.SetFocusOnError = true;
ph.Controls.Add(rv);
// html markup
lit = new Literal();
lit.Text = "</div&rt;<div style=\"float:right;\"&rt;";
ph.Controls.Add(lit);
lit = new Literal();
lit.Text = "<span class=\"EmptySpan\"&rt; </span&rt;";
ph.Controls.Add(lit);
RangeValidator rv1 = new RangeValidator();
rv1.ID = "valPager1";
rv1.Type = ValidationDataType.Integer;
rv1.MinimumValue = "1";
rv1.MaximumValue = "100";
rv1.Text = "not a page";
rv1.EnableClientScript = true;
rv1.ValidationGroup = "PageSize";
rv1.ControlToValidate = "txtPageSize";
rv1.SetFocusOnError = true;
ph.Controls.Add(rv1);
lit = new Literal();
lit.Text = "<span style=\" margin: 0pt; width: 200px; padding-left: 35px;\"&rt;Results per page: ";
ph.Controls.Add(lit);
TextBox tb1 = new TextBox();
tb1.ID = "txtPageSize";
tb1.Text = gv.PageSize.ToString();
tb1.ToolTip = "Enter the Page Size";
tb1.Width = Unit.Pixel(30);
tb1.CausesValidation = true;
tb1.ValidationGroup = "PageSize";
ph.Controls.Add(tb1);
lit = new Literal();
lit.Text = "<span class=\"EmptySpan\"&rt; </span&rt;";
ph.Controls.Add(lit);
ImageButton btn1 = new ImageButton();
btn1.ID = "btnGoToPageSize";
//btn.Text = "Go";
btn1.ImageUrl = "~/Images/go_btn.gif";
btn1.CausesValidation = true;
btn1.ValidationGroup = "PageSize";
btn1.ToolTip = " Page Size";
btn1.Click += new ImageClickEventHandler(btn2_Click);
//btn.OnClientClick = "GeneaSys.Common.addProgressText('Going to grid page...');";
ph.Controls.Add(btn1);
}
/// <summary&rt;
/// Developer: Mansoor: Purpose : Method used to set a gridview footer with Go to page and results per page feature
/// </summary&rt;
/// <param name="gv"&rt;</param&rt;
/// <param name="gvr"&rt;</param&rt;
/// <param name="GridRecordCount"&rt;</param&rt;
public static void GetGridViewPager(GridView gv, GridViewRow gvr,string GridRecordCount)
{
if ((PlaceHolder)gvr.FindControl("phPager") == null)
{
throw new ApplicationException("A placeholder with an ID=\"phPager\" is required for this to work");
}
PlaceHolder ph = (PlaceHolder)gvr.FindControl("phPager");
// html markup and style
StringBuilder sb = new StringBuilder();
sb.Append("<div style=\"float:left;\"&rt;");
sb.Append(string.Format("<span class=\"pagerCurrentPage\"&rt;Page: {0} of {1}</span&rt;", (gv.PageIndex + 1).ToString(), gv.PageCount));
Literal lit = new Literal();
lit.Text = sb.ToString();
ph.Controls.Add(lit);
//adding the table
//StringBuilder sbTable = new StringBuilder();
//sbTable.Append("width=\"100\" cellspacing=\"0\" cellpadding=\"0\" border=\"0\" align=\"left\"&rt;");
//sbTable.Append("
// Previous page button
ImageButton btnImage = new ImageButton();
btnImage.ID = "btnPrevPage";
btnImage.CommandName = "Page";
btnImage.CommandArgument = "Prev";
btnImage.ToolTip = "Previous Page";
//btnImage.ImageAlign = ImageAlign.Middle;
if (gv.PageIndex == 0)
{
btnImage.Enabled = false;
btnImage.ImageUrl = "~/Images/prev_icon.jpg";
}
else
{
btnImage.Enabled = true;
btnImage.ImageUrl = "~/Images/prev_icon.jpg";
//btnImage.OnClientClick = "GeneaSys.Common.addProgressText('Previous grid page...');";
btnImage.Click += new ImageClickEventHandler(btn_Click2);
}
ph.Controls.Add(btnImage);
// Pager page links
LinkButton lnb;
int numberOfPageLinks = gv.PagerSettings.PageButtonCount;
int startPage = (((gv.PageIndex) / numberOfPageLinks) * numberOfPageLinks) + 1;
if (startPage &rt; gv.PageCount - numberOfPageLinks && startPage &rt; numberOfPageLinks) startPage = (gv.PageCount - numberOfPageLinks) + 1;
for (int i = startPage; i < numberOfPageLinks + startPage && i <= gv.PageCount; i++)
{
if (i &rt; startPage)
{
lit = new Literal();
lit.Text = " <span class=\"pageSeperator\"&rt;|</span&rt; ";
ph.Controls.Add(lit);
}
else
{
lit = new Literal();
lit.Text = "<span class=\"pagerPageNumbers\"&rt;";
ph.Controls.Add(lit);
}
if (gv.PageIndex + 1 == i)
{
lit = new Literal();
lit.Text = i.ToString();
ph.Controls.Add(lit);
}
else
{
lnb = new LinkButton();
lnb.CommandName = "Page";
lnb.CommandArgument = i.ToString();
lnb.Text = i.ToString();
ph.Controls.Add(lnb);
}
}
lit = new Literal();
lit.Text = "</span&rt;";
ph.Controls.Add(lit);
// Next page button
btnImage = new ImageButton();
btnImage.ID = "btnNextPage";
btnImage.CommandName = "Page";
btnImage.CommandArgument = "Next";
btnImage.ToolTip = "Next Page";
//btnImage.ImageAlign = ImageAlign.Middle;
if (gv.PageIndex == gv.PageCount - 1)
{
btnImage.Enabled = false;
btnImage.ImageUrl = "~/images/next_icon.jpg";
}
else
{
btnImage.Enabled = true;
btnImage.ImageUrl = "~/Images/next_icon.jpg";
btnImage.Click += new ImageClickEventHandler(btn_Click1);
//btnImage.OnClientClick = "GeneaSys.Common.addProgressText('Next grid page...');";
}
ph.Controls.Add(btnImage);
lit = new Literal();
lit.Text = "<span class=\"EmptySpan\"&rt; </span&rt;";
ph.Controls.Add(lit);
lit = new Literal();
lit.Text = "<span class=\"EmptySpan\"&rt; </span&rt;";
ph.Controls.Add(lit);
lit = new Literal();
lit.Text = "<span style=\"width:600px;\"&rt; Go to page: ";
ph.Controls.Add(lit);
TextBox tb = new TextBox();
tb.ID = "txtGoToPage";
tb.ToolTip = "Enter the Page Number";
tb.Width = Unit.Pixel(30);
tb.CausesValidation = true;
tb.ValidationGroup = "GoToPage";
ph.Controls.Add(tb);
lit = new Literal();
lit.Text = "<span class=\"EmptySpan\"&rt; </span&rt;";
ph.Controls.Add(lit);
ImageButton btn = new ImageButton();
btn.ID = "btnGoToPage";
//btn.Text = "Go";
btn.ImageUrl = "~/Images/go_btn.gif";
btn.CausesValidation = true;
btn.ValidationGroup = "GoToPage";
btn.ToolTip = "Go To Page";
btn.Click += new ImageClickEventHandler(btn_Click);
//btn.OnClientClick = "GeneaSys.Common.addProgressText('Going to grid page...');";
ph.Controls.Add(btn);
RangeValidator rv = new RangeValidator();
rv.ID = "valPager";
rv.Type = ValidationDataType.Integer;
rv.MinimumValue = "1";
rv.MaximumValue = gv.PageCount.ToString();
rv.Text = "not a page";
rv.EnableClientScript = true;
rv.ValidationGroup = "GoToPage";
rv.ControlToValidate = "txtGoToPage";
rv.SetFocusOnError = true;
ph.Controls.Add(rv);
// html markup
lit = new Literal();
lit.Text = "</div&rt;<div style=\"float:right;\"&rt;";
ph.Controls.Add(lit);
lit = new Literal();
lit.Text = "<span class=\"EmptySpan\"&rt; </span&rt;";
ph.Controls.Add(lit);
RangeValidator rv1 = new RangeValidator();
rv1.ID = "valPager1";
rv1.Type = ValidationDataType.Integer;
rv1.MinimumValue = "1";
rv1.MaximumValue = GridRecordCount;
rv1.Text = "Exceeds max records";
rv1.EnableClientScript = true;
rv1.ValidationGroup = "PageSize";
rv1.ControlToValidate = "txtPageSize";
rv1.SetFocusOnError = true;
ph.Controls.Add(rv1);
lit = new Literal();
lit.Text = "<span style=\" margin: 0pt; width: 200px; padding-left: 35px;\"&rt;Results per page: ";
ph.Controls.Add(lit);
TextBox tb1 = new TextBox();
tb1.ID = "txtPageSize";
tb1.Text = gv.PageSize.ToString();
tb1.ToolTip = "Enter the results per Page Size";
tb1.Width = Unit.Pixel(30);
tb1.CausesValidation = true;
tb1.ValidationGroup = "PageSize";
ph.Controls.Add(tb1);
lit = new Literal();
lit.Text = "<span class=\"EmptySpan\"&rt; </span&rt;";
ph.Controls.Add(lit);
ImageButton btn1 = new ImageButton();
btn1.ID = "btnGoToPageSize";
//btn.Text = "Go";
btn1.ImageUrl = "~/Images/go_btn.gif";
btn1.CausesValidation = true;
btn1.ValidationGroup = "PageSize";
btn1.ToolTip = " Page Size";
btn1.Click += new ImageClickEventHandler(btn2_Click);
//btn.OnClientClick = "GeneaSys.Common.addProgressText('Going to grid page...');";
ph.Controls.Add(btn1);
}
private static void btn2_Click(object sender, EventArgs e)
{
GridViewRow gvr = (GridViewRow)((ImageButton)sender).NamingContainer;
TextBox tb = (TextBox)gvr.FindControl("txtPageSize");
GridView gv = (GridView)gvr.NamingContainer;
int pageSize;
if (int.TryParse(tb.Text, out pageSize))
{
if (pageSize <= 0)
{
//gv.PageIndex = 0;
}
else
{
gv.PageSize = int.Parse(tb.Text);
}
}
}
private static void btn_Click(object sender, EventArgs e)
{
//GridViewRow gvr = (GridViewRow)((ImageButton)sender).NamingContainer;
//TextBox tb = (TextBox)gvr.FindControl("txtGoToPage");
//GridView gv = (GridView)gvr.NamingContainer;
//int pageNumber;
//if (int.TryParse(tb.Text, out pageNumber))
//{
// gv.PageIndex = (pageNumber - 1);
//}
GridViewRow gvr = (GridViewRow)((ImageButton)sender).NamingContainer;
TextBox tb = (TextBox)gvr.FindControl("txtGoToPage");
GridView gv = (GridView)gvr.NamingContainer;
int pageNumber;
if (int.TryParse(tb.Text, out pageNumber))
{
if (pageNumber <= 0)
{
//gv.PageIndex = 0;
}
else if (pageNumber <= gv.PageCount)
{
gv.PageIndex = (pageNumber - 1);
}
}
}
private static void btn_Click1(object sender, EventArgs e)
{
GridViewRow gvr = (GridViewRow)((ImageButton)sender).NamingContainer;
TextBox tb = (TextBox)gvr.FindControl("txtGoToPage");
GridView gv = (GridView)gvr.NamingContainer;
int pageNumber = gv.PageIndex;
gv.PageIndex = pageNumber + 1;
}
private static void btn_Click2(object sender, EventArgs e)
{
GridViewRow gvr = (GridViewRow)((ImageButton)sender).NamingContainer;
TextBox tb = (TextBox)gvr.FindControl("txtGoToPage");
GridView gv = (GridView)gvr.NamingContainer;
int pageNumber = gv.PageIndex;
if (pageNumber != 0)
gv.PageIndex = pageNumber - 1;
}
}
Coding in CS page
/// <summary&rt;
/// Method for prerender of grid grvManageRequest
/// </summary&rt;
/// <param name="sender"&rt;</param&rt;
/// <param name="e"&rt;</param&rt;
protected void grvManageRequest_PreRender(object sender, EventArgs e)
{
try
{
//SetGridHeaderSortDirectionArrow((GridView)sender, "SharedEquipmentName");
if (!Page.IsPostBack && !string.IsNullOrEmpty(Request.Params["pgn"]))
{
grvManageRequest.PageIndex = Convert.ToInt32(Request.Params["pgn"]);
}
}
catch (Exception ex)
{
SetResultMessageToLabel("Error :" + ex.Source + " <BR/&rt;Error Message : Error Occured while loading the data to the grid view " + ex.Message, false);
}
}
----------------
protected void grvManageRequest_RowCreated(object sender, GridViewRowEventArgs e)
{
try
{
GridView gv = (GridView)sender;
// This is for the custom grid pager.
if (e.Row.RowType == DataControlRowType.Pager)
{
TotalRecordCount = ocdsManageRequest.Items.Count;
GridViewPageFooter.GetGridViewPager(gv, e.Row);
}
}
catch(Exception ex)
{
}
}
Sunday, November 8, 2009
Wednesday, September 16, 2009
restrict Backspace and Delete in textbox
// This is for the Key Press Event
function Keypress_Event()
{
// This is for Getting the Source Element..
var objTxtBox = window.event.srcElement;
// declare the variable for the bool value.
var isOk = false;
// Here we need not backspace keycode = 8 and the delete keycode 46
isOk = ( event.keyCode == 8 || event.keyCode == 46 ) ? false:true; event.returnValue=isOk;
} And in your aspx call the keypress as
asp:TextBox ID="txtTest" runat="server" onkeydown="Keypress_Event()"
Wednesday, August 12, 2009
Get a Filename from a Path in Javascript
Here's a quick Javascript function that will parse the filename from a path using regex. It looks for any letter or digit, hyphen, or underscore followed by a dot (.) followed by a letters or numbers for the extension.
function getFileName(path) {
return path.match(/[-_\w]+[.][\w]+$/i)[0];
}
function getFileName(path) {
return path.match(/[-_\w]+[.][\w]+$/i)[0];
}
Tuesday, August 4, 2009
Way to get Email Value from web.config in asp text box
<asp:TextBox ID="txtReportTo" runat="server" CssClass="inputbox" Text='<%# System.Configuration.ConfigurationManager.AppSettings["FromMailID"].ToString()%&rt;'
ReadOnly="true"&rt;</asp:TextBox&rt;
ReadOnly="true"&rt;</asp:TextBox&rt;
Wednesday, July 29, 2009
Using XSLT to Transform XML Using ASP.NET
This article gives a brief introduction on XML, XSLT and provides a step-by-step procedure on how XML can be transformed using ASP.NET with the help of code samples in C#.
This article demonstrates how to transform XML using XSLT in ASP.NET using C#. It explains the basics of XML, XSLT and how we could take advantage of XSLT in the web pages that use ASP.NET.
XML has become one of the popular standards for data storage and data transfer. XML does not define tags like other markup languages. Instead, it lets you define your own tags.
to display the XML data there is a need for a language to transform the data. To accommodate this process, XSLT was created. XSLT can be applied to transform XML data into different formats, such as HTML.
The figure below illustrates the transformation process.
What is the difference between XSL and XSLT?
[ Back To Top ]
I have seen XSL and XSLT used interchangeably in the Web developer world. It is, however, helpful to know the difference. XSL (Extensible Stylesheet Language) is the superset of XSLT as it includes XSLT and XSL formatting objects. By using the term XSL, they implicitly mean XSLT.
Transforming XML data using ASP.NET
[ Back To Top ]
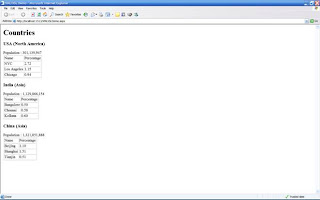
Step 1: Create the XML file
XML can be in memory representation or a flat file. The XML file that I will be using for this illustration is shown below. This file has the population data of different countries along with the names of cities and percentage of population.
<countries&rt;
<country name="USA" continent="North America"&rt;
<stats&rt;
<Population&rt;301,139,947</Population&rt;
<cities&rt;
<city name="NYC" percentage="2.72"/&rt;
<city name="Los Angeles" percentage="1.15"/&rt;
<city name="Chicago" percentage="0.94"/&rt;
</cities&rt;
</stats&rt;
</country&rt;
<country name="India" continent="Asia"&rt;
<stats&rt;
<Population&rt;1,129,866,154</Population&rt;
<cities&rt;
<city name="Bangalore" percentage="0.50"/&rt;
<city name="Chennai" percentage="0.58"/&rt;
<city name="Kolkata" percentage="0.60"/&rt;
</cities&rt;
</stats&rt;
</country&rt;
<country name="China" continent="Asia"&rt;
<stats&rt;
<Population&rt;1,321,851,888</Population&rt;
<cities&rt;
<city name="Beijing" percentage="1.10"/&rt;
<city name="Shanghai" percentage="1.51"/&rt;
<city name="Tianjin" percentage="0.51"/&rt;
</cities&rt;
</stats&rt;
</country&rt;
</countries&rt;
Copy this data into a file and name it aspalliance.xml.
Step 2: Create the XSLT file
The XSLT file can be created using your favorite editor. I recommend XML Spy because it has very good support for XML and XSLT. The stylesheet for this example is shown below.
<?xml version="1.0" encoding="UTF-8"?&rt;
<xsl:stylesheet version="1.0" xmlns:xsl="http://www.w3.org/1999/XSL/Transform"&rt;
<xsl:output method="xml" version="1.0" encoding="UTF-8" indent="yes"/&rt;
<xsl:template match="/"&rt;
<html&rt;
<head/&rt;
<body&rt;
<h1&rt;Countries</h1&rt;
<xsl:apply-templates/&rt;
</body&rt;
</html&rt;
</xsl:template&rt;
<xsl:template match="countries"&rt;
<xsl:apply-templates/&rt;
</xsl:template&rt;
<xsl:template match="country"&rt;
<h3&rt;
<xsl:value-of select="@name"/&rt; (<xsl:value-of select="@continent"/&rt;)
</h3&rt;
<xsl:apply-templates/&rt;
</xsl:template&rt;
<xsl:template match="stats"&rt;
Population : <xsl:value-of select="@Population"/&rt;
<xsl:apply-templates/&rt;
</xsl:template&rt;
<xsl:template match="cities"&rt;
<table border="1" &rt;
<tr&rt;
<td&rt;Name</td&rt;
<td&rt;Percentage</td&rt;
</tr&rt;
<xsl:apply-templates/&rt;
</table&rt;
</xsl:template&rt;
<xsl:template match="city"&rt;
<tr&rt;
<td&rt;
<xsl:value-of select="@name"/&rt;
</td&rt;
<td&rt;
<xsl:value-of select="@percentage"/&rt;
</td&rt;
</tr&rt;
<xsl:apply-templates/&rt;
</xsl:template&rt;
</xsl:stylesheet&rt;
Some important notes about XSLT
You will have noticed that I have a template section for every XML element. When the XSLT processor encounters the statement ) and applies it.
The syntax
Copy this XSLT into a file and name it aspalliance.xslt.
Step 3: Create a web page that displays the XML using XSLT in ASP.NET
ASP.NET has excellent support for XML and XSLT. First, import the necessary namespaces.
Listing 3
using System.Xml;
using System.Xml.Xsl;
using System.Xml.XPath;
using System.IO;Add the XML and XSLT files into the web project. Create an aspx page (or a ascx control) and use the method (ApplyXSLTransformation()) below that will read the XML and the XSLT document and return a string that is the HTML representation of the transformed XML data.
Listing 4
private string ApplyXSLTransformation()
{
string strHtml;
string strXstFile = Server.MapPath("aspalliance.xslt");
XslCompiledTransform x = new XslCompiledTransform();
// Load the XML
XPathDocument doc = new XPathDocument(Server.MapPath("aspalliance.xml"));
// Load the style sheet.
XslCompiledTransform xslt = new XslCompiledTransform();
xslt.Load(strXstFile);
MemoryStream ms = new MemoryStream();
XmlTextWriter writer = new XmlTextWriter(ms, Encoding.ASCII);
StreamReader rd = new StreamReader(ms);
xslt.Transform(doc, writer);
ms.Position = 0;
strHtml = rd.ReadToEnd();
rd.Close();
ms.Close();
return strHtml;
}You can use the string (strHtml) that is returned in this method in anyway useful for your application. Ex: You can assign it to a label or process it further as needed.
Step 4: View the Output
The output of transformation is shown in the figure below.
In this article I covered the basics of XML and XSLT. I also illustrated how to transform XML data using XSLT in ASP.NET. Happy Coding!
This article demonstrates how to transform XML using XSLT in ASP.NET using C#. It explains the basics of XML, XSLT and how we could take advantage of XSLT in the web pages that use ASP.NET.
What is XML (eXtensible Markup Language)?
XML has become one of the popular standards for data storage and data transfer. XML does not define tags like other markup languages. Instead, it lets you define your own tags.
What is XSLT (eXtensible Stylesheet Language Transformation)?
to display the XML data there is a need for a language to transform the data. To accommodate this process, XSLT was created. XSLT can be applied to transform XML data into different formats, such as HTML.
The figure below illustrates the transformation process.

What is the difference between XSL and XSLT?
[ Back To Top ]
I have seen XSL and XSLT used interchangeably in the Web developer world. It is, however, helpful to know the difference. XSL (Extensible Stylesheet Language) is the superset of XSLT as it includes XSLT and XSL formatting objects. By using the term XSL, they implicitly mean XSLT.
Transforming XML data using ASP.NET
[ Back To Top ]
Step 1: Create the XML file
XML can be in memory representation or a flat file. The XML file that I will be using for this illustration is shown below. This file has the population data of different countries along with the names of cities and percentage of population.
<countries&rt;
<country name="USA" continent="North America"&rt;
<stats&rt;
<Population&rt;301,139,947</Population&rt;
<cities&rt;
<city name="NYC" percentage="2.72"/&rt;
<city name="Los Angeles" percentage="1.15"/&rt;
<city name="Chicago" percentage="0.94"/&rt;
</cities&rt;
</stats&rt;
</country&rt;
<country name="India" continent="Asia"&rt;
<stats&rt;
<Population&rt;1,129,866,154</Population&rt;
<cities&rt;
<city name="Bangalore" percentage="0.50"/&rt;
<city name="Chennai" percentage="0.58"/&rt;
<city name="Kolkata" percentage="0.60"/&rt;
</cities&rt;
</stats&rt;
</country&rt;
<country name="China" continent="Asia"&rt;
<stats&rt;
<Population&rt;1,321,851,888</Population&rt;
<cities&rt;
<city name="Beijing" percentage="1.10"/&rt;
<city name="Shanghai" percentage="1.51"/&rt;
<city name="Tianjin" percentage="0.51"/&rt;
</cities&rt;
</stats&rt;
</country&rt;
</countries&rt;
Copy this data into a file and name it aspalliance.xml.
Step 2: Create the XSLT file
The XSLT file can be created using your favorite editor. I recommend XML Spy because it has very good support for XML and XSLT. The stylesheet for this example is shown below.
<?xml version="1.0" encoding="UTF-8"?&rt;
<xsl:stylesheet version="1.0" xmlns:xsl="http://www.w3.org/1999/XSL/Transform"&rt;
<xsl:output method="xml" version="1.0" encoding="UTF-8" indent="yes"/&rt;
<xsl:template match="/"&rt;
<html&rt;
<head/&rt;
<body&rt;
<h1&rt;Countries</h1&rt;
<xsl:apply-templates/&rt;
</body&rt;
</html&rt;
</xsl:template&rt;
<xsl:template match="countries"&rt;
<xsl:apply-templates/&rt;
</xsl:template&rt;
<xsl:template match="country"&rt;
<h3&rt;
<xsl:value-of select="@name"/&rt; (<xsl:value-of select="@continent"/&rt;)
</h3&rt;
<xsl:apply-templates/&rt;
</xsl:template&rt;
<xsl:template match="stats"&rt;
Population : <xsl:value-of select="@Population"/&rt;
<xsl:apply-templates/&rt;
</xsl:template&rt;
<xsl:template match="cities"&rt;
<table border="1" &rt;
<tr&rt;
<td&rt;Name</td&rt;
<td&rt;Percentage</td&rt;
</tr&rt;
<xsl:apply-templates/&rt;
</table&rt;
</xsl:template&rt;
<xsl:template match="city"&rt;
<tr&rt;
<td&rt;
<xsl:value-of select="@name"/&rt;
</td&rt;
<td&rt;
<xsl:value-of select="@percentage"/&rt;
</td&rt;
</tr&rt;
<xsl:apply-templates/&rt;
</xsl:template&rt;
</xsl:stylesheet&rt;
Some important notes about XSLT
You will have noticed that I have a template section for every XML element. When the XSLT processor encounters the statement
The syntax
Copy this XSLT into a file and name it aspalliance.xslt.
Step 3: Create a web page that displays the XML using XSLT in ASP.NET
ASP.NET has excellent support for XML and XSLT. First, import the necessary namespaces.
Listing 3
using System.Xml;
using System.Xml.Xsl;
using System.Xml.XPath;
using System.IO;Add the XML and XSLT files into the web project. Create an aspx page (or a ascx control) and use the method (ApplyXSLTransformation()) below that will read the XML and the XSLT document and return a string that is the HTML representation of the transformed XML data.
Listing 4
private string ApplyXSLTransformation()
{
string strHtml;
string strXstFile = Server.MapPath("aspalliance.xslt");
XslCompiledTransform x = new XslCompiledTransform();
// Load the XML
XPathDocument doc = new XPathDocument(Server.MapPath("aspalliance.xml"));
// Load the style sheet.
XslCompiledTransform xslt = new XslCompiledTransform();
xslt.Load(strXstFile);
MemoryStream ms = new MemoryStream();
XmlTextWriter writer = new XmlTextWriter(ms, Encoding.ASCII);
StreamReader rd = new StreamReader(ms);
xslt.Transform(doc, writer);
ms.Position = 0;
strHtml = rd.ReadToEnd();
rd.Close();
ms.Close();
return strHtml;
}You can use the string (strHtml) that is returned in this method in anyway useful for your application. Ex: You can assign it to a label or process it further as needed.
Step 4: View the Output
The output of transformation is shown in the figure below.

In this article I covered the basics of XML and XSLT. I also illustrated how to transform XML data using XSLT in ASP.NET. Happy Coding!
Tuesday, July 28, 2009
Model-view-presenter
Model-view-presenter is a software pattern, considered a derivative of the model-view-controller.
Model-view-presenter is a user interface design pattern engineered to facilitate automated unit testing and improve the separation of concerns in presentation logic.
The model is an interface defining the data to be displayed or otherwise acted upon in the user interface.
The view is an interface that displays data (the model) and routes user commands to the presenter to act upon that data.
The presenter acts upon the model and the view. It retrieves data from repositories, persists it, manipulates it, and determines how it will be displayed in the view.
Normally, the view implementation instantiates the concrete presenter object, providing a reference to itself. The following C# code demonstrates a simple view constructor, where ConcreteDomainPresenter implements the IDomainPresenter interface:
public class DomainView: IDomainView
{
private IDomainPresenter mDomainPresenter;
public DomainView()
{
this.mDomainPresenter = new ConcreteDomainPresenter(this);
}
}
The degree of logic permitted in the view varies among different implementations.
At one extreme, the view is entirely passive, forwarding all interaction operations to the presenter. In this formulation, when a user triggers an event method of the view, it does nothing but invoke a method of the presenter which has no parameters and no return value. The presenter then retrieves data from the view through methods defined by the view interface. Finally, the presenter then operates on the model and updates the view with the results of the operation.
Other versions of model-view-presenter allow some latitude with respect to which class handles a particular interaction, event, or command. This is often more suitable for web-based architectures, where the view, which executes on a client's browser, may be the best place to handle a particular interaction or command.
From a layering point of view, the presenter class might be considered as belonging to the application layer in a multilayered architectured object-oriented system with common layers but it can also be seen as a presenter layer of its own between the application layer and the user interface layer.
In a .NET environment the same presenter class can be used for ASP.NET application and a Windows Forms application. The presenter gets and sets information from/to the view through an interface that in .NET can be implemented by both Windows Forms class and an ASPX page (the code-behind class can implement the view interface).
Instead of manually implementing the pattern, one of the model-view-presenter frameworks may be used. Below are listed some of such frameworks under the .NET platform.
[edit]
* MVC# Framework
* NMVP Framework
* Web Client Software FactoryDescription

As UI-creation technologies such as ASP.NET and Windows® Forms become more and more powerful, it's common practice to let the UI layer do more than it should. Without a clear separation of responsibilities, the UI layer can often become a catch-all for logic that really belongs in other layers of the application. One design pattern, the Model View Presenter (MVP) pattern, is especially well suited to solving this problem. In order to illustrate my point, I will build a display screen that follows the MVP pattern for customers in the Northwind database.
Why is it bad to have lots of logic in the UI layer? The code in the UI layer of an application is very difficult to test without either running the application manually or maintaining ugly UI runner scripts that automate the execution of UI components. While this is a big problem in itself, an even bigger problem is the reams of code that are duplicated between common views in an application. It can often be hard to see good candidates for refactoring when the logic to perform a specific business function is copied among different pieces in the UI layer. The MVP design pattern makes it much easier to factor logic and code out of the UI layer for more streamlined, reusable code that's easier to test.
Figure 1 shows the main layers that make up the sample application. Notice that there are separate packages for UI and presentation. You might have expected them to be the same, but actually the UI layer of a project should consist only of the various UI elements—forms and controls. In a Web Forms project this is typically a collection of ASP.NET Web Forms, user controls, and server controls. In Windows Forms, it is a collection of Windows Forms, user controls, and third-party libraries. This extra layer is what keeps the display and the logic separate. In the presentation layer you have the objects that actually implement the behavior for the UI—things like validation display, collection input from the UI, and so forth.
.gif)
Following the MVP
As you can see in Figure 2, the UI for this project is pretty standard. When the page loads, the screen will display a dropdown box filled with all of the customers in the Northwind database. If you select a customer from the dropdown list, the page will update to display the information for that customer. By following the MVP design pattern you can factor behaviors out of the UI and into their own classes. Figure 3 shows a class diagram that indicates the association between the different classes that are involved.
.gif)
It's important to note that the presenter has no knowledge of the actual UI layer of the application. It knows it can talk to an interface, but it does not know or care what the implementation of that interface is. This promotes reuse of presenters between disparate UI technologies.
I am going to use Test Driven Development (TDD) to build the functionality of the customer screen. Figure 4 shows the details for the first test I will use to describe the behavior I expect to observe on page load. TDD lets me focus on one problem at a time, write just enough code to make the test pass, and then carry on. In this test I am making use of a mock object framework called NMock2 that allows me to build mock implementations of interfaces
[Test]
public void ShouldLoadListOfCustomersOnInitialize()
{
mockery = new Mockery();
ICustomerTask mockCustomerTask = mockery.NewMock();
IViewCustomerView mockViewCustomerView =
mockery.NewMock();
ILookupList mockCustomerLookupList = mockery.NewMock();
ViewCustomerPresenter presenter =
new ViewCustomerPresenter(mockViewCustomerView,
mockCustomerTask);
ILookupCollection mockLookupCollection =
mockery.NewMock();
Expect.Once.On(mockCustomerTask).Method(
"GetCustomerList").Will(Return.Value(mockLookupCollection));
Expect.Once.On(mockViewCustomerView).GetProperty(
"CustomerList").Will(Return.Value(mockCustomerLookupList));
Expect.Once.On(mockLookupCollection).Method(
"BindTo").With(mockCustomerLookupList);
presenter.Initialize();
}
.gif)
Figure 3 MVP Class Diagram
In my MVP implementation, I have decided that the presenter is going to take as a dependency the view it is going to work with. It is always good to create objects in a state that enables them to do their work immediately. In this application, the presentation layer is dependent on the service layer to actually invoke the domain functionality. Because of this requirement it also makes sense to construct a presenter with an interface to a service class that it can talk to. This ensures that once a presenter is constructed, it is ready to do all of the work it needs to do. I start off by creating two specific mocks: one for the service layer and one for the view that the presenter will work with.
Why mocks? A rule of unit testing is to isolate the test as much as possible to focus on one specific object. In this test I am only interested in the expected behavior of the presenter. At this point I don't care about the actual implementation of the view interface or service interface; I trust the contracts defined by those interfaces and set the mocks to behave accordingly. This ensures that I focus my test solely around the behavior I expect of the presenter, not of any of its dependencies. The behavior I expect the presenter to exhibit after its initialize method is invoked is as follows.
First, the presenter should make one call to the GetCustomerList method on the ICustomerTask service layer object (mocked in the test). Notice that with the use of NMock I can simulate behavior of the mock. In the case of the service layer, I want it to return a mock ILookupCollection to the presenter. Then, after the presenter retrieves the ILookupCollection from the service layer, it should invoke the collection's BindTo method and pass the method an implementation of an ILookupList. By using the NMockExpect.Once method I can be sure that the test will fail if the presenter does not call the method once and only once.
After writing that test I am in a completely non-compilable state. I'm going to do the simplest thing possible to get the test to pass.
Making the First Test Pass
One of the advantages of writing the test first is that I now have a blueprint (the test) I can follow to get the test to compile and eventually pass. The first test has two interfaces that do not yet exist. These interfaces are the first prerequisites for getting the code to compile correctly. I'll start with the code for IViewCustomerView:
public interface IViewCustomerView
{
ILookupList CustomerList { get; }
}
This interface exposes one property that returns an ILookupList interface implementation. I don't yet have an ILookupList interface or even an implementer, for that matter. For the purpose of getting this test to pass I don't need an explicit implementor, so I can proceed to create the ILookupList interface:
public interface ILookupList { }
At this point the ILookupList interface looks pretty useless. My goal is to get the test to compile and pass, and these interfaces satisfy the test's requirements. It's time to shift focus to the object that I'm actually testing—the ViewCustomerPresenter. This class does not exist yet, but looking at the test you can glean two important facts about it: it has a constructor that requires both a view and service implementation as dependencies, and it has a void Initialize method. The code in Figure 5 shows how to compile the test.
Figure 5 Compiling the Test
public class ViewCustomerPresenter
{
private readonly IViewCustomerView view;
private readonly ICustomerTask task;
public ViewCustomerPresenter(
IViewCustomerView view, ICustomerTask task)
{
this.view = view;
this.task = task;
}
public void Initialize()
{
throw new NotImplementedException();
}
}
Remember that a presenter requires all of its dependencies in order to do its work meaningfully; this is why the view and service are passed in. I have not implemented the initialize method so if I run the test I get a NotImplementedException.
As mentioned already, I am not coding the presenter blindly; I already know, from looking at the test, what behavior the presenter should exhibit once the initialize method is called. The implementation of that behavior is as follows:
public void Initialize()
{
task.GetCustomerList().BindTo(view.CustomerList);
}
In the source code accompanying this article there is a complete implementation of the GetCustomerList method in the CustomerTask class (which implements the ICustomerTask interface). From the perspective of implementing and testing the presenter, though, I don't need to know whether there is a working implementation yet. It is this level of abstraction that allows me to plow through with the testing of the presenter class. The first test is now in a state that will compile and run. This proves that when the Initialize method on the presenter is called, it will interact with its dependencies in the manner that I specified in the test, and ultimately when the concrete implementations of those dependencies are injected into the presenter, I can be sure that the resulting view (the ASPX page) will be filled with a list of Customers.
Filling the DropDownList
So far I have been dealing mainly with interfaces to abstract the actual implementation details away, allowing the focus to be on the presenter. It is now time to build some of the plumbing that will ultimately allow the presenter to populate a list on a Web page in a way that can be tested. The key to making this work is the interaction that will occur in the BindTo method of the LookupCollection class. If you take a look at the implementation of the LookupCollection class in Figure 6, you will notice that it implements the ILookupCollection interface. The source code for the article has the accompanying tests that were used to build up the functionality of the LookupCollection class.
Figure 6 The LookupCollection Class
public class LookupCollection : ILookupCollection
{
private IList items;
public LookupCollection(IEnumerable items)
{
this.items = new List(items);
}
public int Count { get { return items.Count; } }
public void BindTo(ILookupList list)
{
list.Clear();
foreach (ILookupDTO dto in items) list.Add(dto);
}
}
The implementation of the BindTo method is of particular interest. Notice that in this method the collection iterates through its own private list of ILookupDTO implementations. An ILookupDTO is an interface that caters well to binding to comboboxes in the UI layer:
public interface ILookupDTO
{
string Value { get; }
string Text { get; }
}
Figure 7 shows the code that tests the lookup collection's BindTo method, which will help explain the expected interaction between a LookupCollection and an ILookupList. The last line is of particular interest. In this test I expect that before attempting to add items to the list, the LookupCollection will invoke the Clear method on the ILookupList implementation. I then expect Add to be called on an ILookupList 10 times, and as an argument to the Add method, the LookupCollection will pass in an object that implements the ILookupDTO interface. To make this actually work with a control that lives in a Web project (such as a dropdown listbox) you will need to create an implementation of ILookupList that knows how to work with controls in a Web project.
Figure 7 A Test that Describes Behavior
[Test]
public void ShouldBeAbleToBindToLookupList()
{
IList dtos = new IList;
ILookupList mockLookupList = mockery.NewMock();
Expect.Once.On(mockLookupList).Method("Clear");
for (int i = 0; i < 10; i++)
{
SimpleLookupDTO dto =
new SimpleLookupDTO(i.ToString(),i.ToString());
dtos.Add(dto);
Expect.Once.On(mockLookupList).Method("Add").With(dto);
}
new LookupCollection(dtos).BindTo(mockLookupList);
}
The source code that accompanies this article contains a project named MVP.Web.Controls. This project contains any Web-specific controls or classes that I chose to create to complete the solution. Why did I place the code in this project and not in the APP_CODE directory or the Web project itself? Testability. Anything that lives in the Web project is difficult to test directly without either running the application manually or automating the UI using some sort of testing robot. The MVP pattern allows me to think at a higher level of abstraction and test implementations of the core interfaces (ILookupList and ILookupCollection) without manually running the application. I am going to add a new class, a WebLookupList control, to the Web.Controls project. Figure 8 shows the first test for this class.
Figure 8 First Test for WebLookupList Control
[Test]
public void ShouldAddItemToUnderlyingList()
{
ListControl webList = new DropDownList();
ILookupList list = new WebLookupList(webList);
SimpleLookupDTO dto = new SimpleLookupDTO("1","1");
list.Add(dto);
Assert.AreEqual(1, webList.Items.Count);
Assert.AreEqual(dto.Value, webList.Items[0].Value);
Assert.AreEqual(dto.Text, webList.Items[0].Text);
}
Some things stand out in the test that is shown in Figure 8. The test project clearly needs a reference to the System.Web library so that it can instantiate DropDownList Web controls. Looking at the test, you should see that the WebLookupList class will implement the ILookupList interface. It is also going to take a ListControl as a dependency. Two of the most common ListControl implementations in the System.Web.UI.WebControls namespace are the DropDownList and the ListBox classes. A key feature of the test in Figure 8 is the fact that I am ensuring that a WebLookupList correctly updates the state of an actual Web ListControl to which it is delegating responsibility. Figure 9 shows the class diagram for the classes involved in the WebLookupList implementation. I can satisfy the requirements of the first test for the WebLookupList control with the code in Figure 10.
Figure 10 WebLookupList Control
public class WebLookupList : ILookupList
{
private ListControl underlyingList;
public WebLookupList(ListControl underlyingList)
{
this.underlyingList = underlyingList;
}
public void Add(ILookupDTO dto)
{
underlyingList.Items.Add(new ListItem(dto.Text, dto.Value));
}
}
.gif)
Figure 9 WebLookupList Class
Remember, one of the keys to MVP is the separation of layers introduced by the creation of a view interface. The presenter doesn't know what implementation of a view, and respectively an ILookupList, it will be talking to; it just knows that it will be able to call any of the methods defined by those interfaces. Ultimately, the WebLookupList class is a class that wraps and delegates to an underlying ListControl (base class for some of the ListControls defined in the System.Web.UI.WebControls project). With that code now in place, I can compile and run the WebLookupList control test which should pass. I can add one more test for the WebLookupList that tests the actual behavior of the clear method:
[Test]
public void ShouldClearUnderlyingList()
{
ListControl webList = new DropDownList();
ILookupList list = new WebLookupList(webList);
webList.Items.Add(new ListItem("1", "1"));
list.Clear();
Assert.AreEqual(0, webList.Items.Count);
}
Again I am testing that the WebLookupList class will actually change the state of the underlying ListControl (DropDownList) when its own methods are invoked. The WebLookupList is now feature complete for the purposes of populating a DropDownList in a Web Form. It is now time for me to wire everything together and get the Web page's dropdown filled with a list of customers.
Implementing the View Interface
Because I am building a Web Forms front end, it makes sense that the implementer for the IViewCustomerView interface would be a Web Form or a user control. For the purpose of this column, I'll make it a Web Form. The general appearance of the page has already been created, as you saw in Figure 2. Now I need only to implement the view interface. Switching to the codebehind for the ViewCustomers.aspx page, I can add the following code, indicating that the page is required to implement the IViewCustomersView interface:
public partial class ViewCustomers : Page,IViewCustomerView
If you look at the code sample, you'll notice that the Web project and the Presentation are two completely different assemblies. Also, the Presentation project has no reference whatsoever to the Web.UI project, further maintaining the layer of separation. On the other hand, the Web.UI project has to have a reference to the Presentation project, as that is where the View interface and the presenter live.
By choosing to implement the IViewCustomerView interface, our Web page now has a responsibility to implement any methods or properties defined by that interface. Currently there is only one property on the IViewCustomerView interface and that is a getter that returns any implementation of an ILookupList interface. I added a reference to the Web.Controls project so that I can instantiate a WebLookupListControl. I did this because the WebLookupListControl implements the ILookupList interface and it knows how to delegate to actual WebControls that live in ASP.NET. Taking a look at the ASPX for the ViewCustomer page, you will see that the list of customers is simply an asp:DropDownList control:
Customers:
With this already in place, I can quickly continue to implement the code required to satisfy the implementation of the IViewCustomerView interface:
public ILookupList CustomerList
{
get { return new WebLookupList(this.customerDropDownList);}
}
I now need to invoke the Initialize method on the presenter that will trigger it to actually do some work. To do that, the view needs to be able to instantiate the presenter so that methods on it can be invoked. If you look back to the presenter, you'll remember that it requires both a view and a service that it will work with. The ICustomerTask interface represents an interface that lives in the service layer of the application. Service layers are typically responsible for orchestrating the interaction between domain objects and converting the results of those interactions into Data Transfer Objects (DTOs) that are then passed from the service layer to the presentation layer and then to the UI layer. There is a problem, however—I have stipulated that the presenter needs to be constructed with both the view and service implementations.
The actual instantiation of the presenter is going to take place in the codebehind for the Web page. This is a problem, because the UI project has no reference to the service layer project. The presentation project does, however, have a reference to the service layer project. This allows me to solve the problem by adding an overloaded constructor to the ViewCustomerPresenterClass:
public ViewCustomerPresenter(IViewCustomerView view) :
this(view, new CustomerTask()) {}
This new constructor satisfies the presenter's requirement for implementations of both the view and the service, while also maintaining the separation of the UI layer from the service layer. It is now fairly trivial to finish off the code for the codebehind:
protected override void OnInit(EventArgs e)
{
base.OnInit(e);
presenter = new ViewCustomerPresenter(this);
}
protected void Page_Load(object sender, EventArgs e)
{
if (!IsPostBack) presenter.Initialize();
}
Notice the key to the instantiation of the presenter is the fact that I am making use of the newly created overload for the constructor, and the Web Form passes itself in as an object that implements the view interface!
With the code for the codebehind implemented, I can now build and run the application. The DropDownList on the Web page is now filled with a list of customer names without the need for any databinding code in the codebehind. Plus, scores of tests have been run on all the pieces that ultimately work together, ensuring that the presentation layer architecture will behave as expected.
I'm going to wrap up my discussion of MVP by showing what is required to display customer information for a customer selected in the DropDownList. Once again, I start by writing a test that describes the behavior I hope to observe (see Figure 11).
Figure 11 One Last Test
[Test]
public void ShouldDisplayCustomerDetails()
{
SimpleLookupDTO lookupDTO = new SimpleLookupDTO("1","JPBOO");
CustomerDTO dto = new CustomerDTO("BLAH", "BLAHCOMPNAME",
"BLAHCONTACTNAME", "BLAHCONTACTTILE", "ADDRESS", "CITY",
"REGION", "POSTALCODE", Country.CANADA, "4444444", "4444444");
Expect.Once.On(mockViewCustomerView).GetProperty(
"CustomerList").Will(Return.Value(mockCustomerLookupList));
Expect.Once.On(mockCustomerLookupList).GetProperty(
"SelectedItem").Will(Return.Value(lookupDTO));
Expect.Once.On(mockCustomerTask).Method(
"GetDetailsForCustomer").With(1).Will(Return.Value(dto));
Expect.Once.On(mockViewCustomerView).SetProperty(
"CompanyName").To(dto.CompanyName);
Expect.Once.On(mockViewCustomerView).SetProperty(
"ContactName").To(dto.ContactName);
Expect.Once.On(mockViewCustomerView).SetProperty(
"ContactTitle").To(dto.ContactTitle);
Expect.Once.On(mockViewCustomerView).SetProperty(
"Address").To(dto.Address);
Expect.Once.On(mockViewCustomerView).SetProperty(
"City").To(dto.City);
Expect.Once.On(mockViewCustomerView).SetProperty(
"Region").To(dto.Region);
Expect.Once.On(mockViewCustomerView).SetProperty(
"PostalCode").To(dto.PostalCode);
Expect.Once.On(mockViewCustomerView).SetProperty(
"Country").To(dto.CountryOfResidence.Name);
Expect.Once.On(mockViewCustomerView).SetProperty(
"Phone").To(dto.Phone);
Expect.Once.On(mockViewCustomerView).SetProperty("Fax").To(dto.Fax);
presenter.DisplayCustomerDetails();
}
As before, I am taking advantage of the NMock library to create mocks of the task and view interfaces. This particular test verifies the behavior of the presenter by asking the service layer for a DTO representing a particular customer. Once the presenter retrieves the DTO from the service layer, it will update properties on the view directly, thus eliminating the need for the view to have any knowledge of how to correctly display the information from the object. For brevity I am not going to discuss the implementation of the SelectedItem property on the WebLookupList control; instead I will leave it to you to examine the source code to see the implementation details. What this test really demonstrates is the interaction that occurs between the presenter and the view once the presenter retrieves a CustomerDTO from the service layer. If I attempt to run the test now, I will be in a big failure state as a lot of the properties don't yet exist on the view interface. So I'll go ahead and add the necessary members to the IViewCustomerView interface, as you see in Figure 12.
Figure 12 Completing the IVewCustomerView Interface
public interface IViewCustomerView
{
ILookupList CustomerList{get;}
string CompanyName{set;}
string ContactName{set;}
string ContactTitle{set;}
string Address{set;}
string City{set;}
string Region{set;}
string PostalCode{set;}
string Country{set;}
string Phone{set;}
string Fax{set;}
}
Immediately after adding these interface members, my Web Form complains because it is no longer fulfilling the contract of the interface, so I have to go back to the codebehind for my Web Form and implement the remaining members. As stated before, the entire markup for the Web page has already been created, as have the table cells which have been marked with the "runat=server" attribute and are named according to the information that should be displayed in them. This makes the resulting code to implement the interface members very trivial:
public string CompanyName
{
set { this.companyNameLabel.InnerText = value; }
}
public string ContactName
{
set { this.contactNameLabel.InnerText = value; }
}
...
With the setter properties implemented, there is just one thing left to do. I need a way to tell the presenter to display the information for the selected customer. Looking back at the test, you can see that the implementation of this behavior will live in the DisplayCustomerDetails method on the presenter. This method will not, however, take any arguments. When invoked, the presenter will turn back around to the view, pull from it any information it needs (which it will retrieve by using the ILookupList), and then use that information to retrieve the details about the customer in question. All that I need to do from a UI perspective is set the AutoPostBack property of the DropDownList to true, and I also need to add the following event handler hookup code to the OnInit method of the page:
protected override void OnInit(EventArgs e)
{
base.OnInit(e);
presenter = new ViewCustomerPresenter(this);
this.customerDropDownList.SelectedIndexChanged += delegate
{
presenter.DisplayCustomerDetails();
};
}
This event handler ensures that whenever a new customer is selected in the dropdown, the view will ask the presenter to display the details for that customer.
It is important to note that this is typical behavior. When a view asks a presenter to do something, it asks without giving any specific details, and it is up to the presenter to return to the view and get any information it needs using the view interface. Figure 13 shows the code required to implement the required behavior in the presenter.
Figure 13 Completing the Presenter
public void DisplayCustomerDetails()
{
int? customerId = SelectedCustomerId;
if (customerId.HasValue)
{
CustomerDTO customer =
task.GetDetailsForCustomer(customerId.Value);
UpdateViewFrom(customer);
}
}
private int? SelectedCustomerId
{
get
{
string selectedId = view.CustomerList.SelectedItem.Value;
if (String.IsNullOrEmpty(selectedId)) return null;
int? id = null;
try
{
id = int.Parse(selectedId.Trim());
}
catch (FormatException) {}
return id;
}
}
private void UpdateViewFrom(CustomerDTO customer)
{
view.CompanyName = customer.CompanyName;
view.ContactName = customer.ContactName;
view.ContactTitle = customer.ContactTitle;
view.Address = customer.Address;
view.City = customer.City;
view.Region = customer.Region;
view.Country = customer.CountryOfResidence.Name;
view.Phone = customer.Phone;
view.Fax = customer.Fax;
view.PostalCode = customer.PostalCode;
}
Hopefully you now see the value of adding the presenter layer. It is the presenter's responsibility to attempt to retrieve an ID for a customer for whom it needs to display details. This is code that would normally have been performed in the codebehind, but is now inside a class that I can fully test and exercise outside of any presentation-layer technology.
In the event that the presenter can retrieve a valid customer ID from the view, it turns to the service layer and asks for a DTO that represents the details for the customer. Once the presenter has the DTO in hand, it updates the view with the information contained in the DTO. A key point to note is the simplicity of the view interface; aside from the ILookupList interface, the view interface consists entirely of string DataTypes. It is ultimately the responsibility of the presenter to correctly convert and format the information retrieved from the DTO so that it can actually be handed to the view as a string. Although not demonstrated in this example, the presenter would also be responsible for reading information from the view and converting it to the necessary types that the service layer would expect.
With all the pieces in place I can now run the application. When the page first loads, I get a list of customers and the first customer appears (not selected) in the DropDownList. If I select a customer, a postback occurs, the interaction between the view and the presenter takes place, and the Web page is updated with the related customer information.
What's Next?
The Model View Presenter design pattern is really just a fresh take on the Model View Controller pattern that many developers are already familiar with; the key distinction is that MVP truly separates the UI from the domain/service layer of the application. Although this example was fairly simple from a requirements perspective, it should help you abstract the interaction between a UI and the other layers of your applications. Also, you should now see ways that you can use these layers of indirection to make your application more testable with automation. As you delve deeper into the MVP pattern, I hope you'll find other ways to pull as much formatting and conditional logic out of your codebehinds and place them into testable view/presenter interaction models.
Model-view-presenter is a user interface design pattern engineered to facilitate automated unit testing and improve the separation of concerns in presentation logic.
The model is an interface defining the data to be displayed or otherwise acted upon in the user interface.
The view is an interface that displays data (the model) and routes user commands to the presenter to act upon that data.
The presenter acts upon the model and the view. It retrieves data from repositories, persists it, manipulates it, and determines how it will be displayed in the view.
Normally, the view implementation instantiates the concrete presenter object, providing a reference to itself. The following C# code demonstrates a simple view constructor, where ConcreteDomainPresenter implements the IDomainPresenter interface:
public class DomainView: IDomainView
{
private IDomainPresenter mDomainPresenter;
public DomainView()
{
this.mDomainPresenter = new ConcreteDomainPresenter(this);
}
}
The degree of logic permitted in the view varies among different implementations.
At one extreme, the view is entirely passive, forwarding all interaction operations to the presenter. In this formulation, when a user triggers an event method of the view, it does nothing but invoke a method of the presenter which has no parameters and no return value. The presenter then retrieves data from the view through methods defined by the view interface. Finally, the presenter then operates on the model and updates the view with the results of the operation.
Other versions of model-view-presenter allow some latitude with respect to which class handles a particular interaction, event, or command. This is often more suitable for web-based architectures, where the view, which executes on a client's browser, may be the best place to handle a particular interaction or command.
From a layering point of view, the presenter class might be considered as belonging to the application layer in a multilayered architectured object-oriented system with common layers but it can also be seen as a presenter layer of its own between the application layer and the user interface layer.
In a .NET environment the same presenter class can be used for ASP.NET application and a Windows Forms application. The presenter gets and sets information from/to the view through an interface that in .NET can be implemented by both Windows Forms class and an ASPX page (the code-behind class can implement the view interface).
Instead of manually implementing the pattern, one of the model-view-presenter frameworks may be used. Below are listed some of such frameworks under the .NET platform.
[edit]
Model-view-presenter frameworks under .NET
* MVC# Framework
* NMVP Framework
* Web Client Software FactoryDescription

As UI-creation technologies such as ASP.NET and Windows® Forms become more and more powerful, it's common practice to let the UI layer do more than it should. Without a clear separation of responsibilities, the UI layer can often become a catch-all for logic that really belongs in other layers of the application. One design pattern, the Model View Presenter (MVP) pattern, is especially well suited to solving this problem. In order to illustrate my point, I will build a display screen that follows the MVP pattern for customers in the Northwind database.
Why is it bad to have lots of logic in the UI layer? The code in the UI layer of an application is very difficult to test without either running the application manually or maintaining ugly UI runner scripts that automate the execution of UI components. While this is a big problem in itself, an even bigger problem is the reams of code that are duplicated between common views in an application. It can often be hard to see good candidates for refactoring when the logic to perform a specific business function is copied among different pieces in the UI layer. The MVP design pattern makes it much easier to factor logic and code out of the UI layer for more streamlined, reusable code that's easier to test.
Figure 1 shows the main layers that make up the sample application. Notice that there are separate packages for UI and presentation. You might have expected them to be the same, but actually the UI layer of a project should consist only of the various UI elements—forms and controls. In a Web Forms project this is typically a collection of ASP.NET Web Forms, user controls, and server controls. In Windows Forms, it is a collection of Windows Forms, user controls, and third-party libraries. This extra layer is what keeps the display and the logic separate. In the presentation layer you have the objects that actually implement the behavior for the UI—things like validation display, collection input from the UI, and so forth.
.gif)
Following the MVP
As you can see in Figure 2, the UI for this project is pretty standard. When the page loads, the screen will display a dropdown box filled with all of the customers in the Northwind database. If you select a customer from the dropdown list, the page will update to display the information for that customer. By following the MVP design pattern you can factor behaviors out of the UI and into their own classes. Figure 3 shows a class diagram that indicates the association between the different classes that are involved.
.gif)
It's important to note that the presenter has no knowledge of the actual UI layer of the application. It knows it can talk to an interface, but it does not know or care what the implementation of that interface is. This promotes reuse of presenters between disparate UI technologies.
I am going to use Test Driven Development (TDD) to build the functionality of the customer screen. Figure 4 shows the details for the first test I will use to describe the behavior I expect to observe on page load. TDD lets me focus on one problem at a time, write just enough code to make the test pass, and then carry on. In this test I am making use of a mock object framework called NMock2 that allows me to build mock implementations of interfaces
[Test]
public void ShouldLoadListOfCustomersOnInitialize()
{
mockery = new Mockery();
ICustomerTask mockCustomerTask = mockery.NewMock
IViewCustomerView mockViewCustomerView =
mockery.NewMock
ILookupList mockCustomerLookupList = mockery.NewMock
ViewCustomerPresenter presenter =
new ViewCustomerPresenter(mockViewCustomerView,
mockCustomerTask);
ILookupCollection mockLookupCollection =
mockery.NewMock
Expect.Once.On(mockCustomerTask).Method(
"GetCustomerList").Will(Return.Value(mockLookupCollection));
Expect.Once.On(mockViewCustomerView).GetProperty(
"CustomerList").Will(Return.Value(mockCustomerLookupList));
Expect.Once.On(mockLookupCollection).Method(
"BindTo").With(mockCustomerLookupList);
presenter.Initialize();
}
.gif)
Figure 3 MVP Class Diagram
In my MVP implementation, I have decided that the presenter is going to take as a dependency the view it is going to work with. It is always good to create objects in a state that enables them to do their work immediately. In this application, the presentation layer is dependent on the service layer to actually invoke the domain functionality. Because of this requirement it also makes sense to construct a presenter with an interface to a service class that it can talk to. This ensures that once a presenter is constructed, it is ready to do all of the work it needs to do. I start off by creating two specific mocks: one for the service layer and one for the view that the presenter will work with.
Why mocks? A rule of unit testing is to isolate the test as much as possible to focus on one specific object. In this test I am only interested in the expected behavior of the presenter. At this point I don't care about the actual implementation of the view interface or service interface; I trust the contracts defined by those interfaces and set the mocks to behave accordingly. This ensures that I focus my test solely around the behavior I expect of the presenter, not of any of its dependencies. The behavior I expect the presenter to exhibit after its initialize method is invoked is as follows.
First, the presenter should make one call to the GetCustomerList method on the ICustomerTask service layer object (mocked in the test). Notice that with the use of NMock I can simulate behavior of the mock. In the case of the service layer, I want it to return a mock ILookupCollection to the presenter. Then, after the presenter retrieves the ILookupCollection from the service layer, it should invoke the collection's BindTo method and pass the method an implementation of an ILookupList. By using the NMockExpect.Once method I can be sure that the test will fail if the presenter does not call the method once and only once.
After writing that test I am in a completely non-compilable state. I'm going to do the simplest thing possible to get the test to pass.
Making the First Test Pass
One of the advantages of writing the test first is that I now have a blueprint (the test) I can follow to get the test to compile and eventually pass. The first test has two interfaces that do not yet exist. These interfaces are the first prerequisites for getting the code to compile correctly. I'll start with the code for IViewCustomerView:
public interface IViewCustomerView
{
ILookupList CustomerList { get; }
}
This interface exposes one property that returns an ILookupList interface implementation. I don't yet have an ILookupList interface or even an implementer, for that matter. For the purpose of getting this test to pass I don't need an explicit implementor, so I can proceed to create the ILookupList interface:
public interface ILookupList { }
At this point the ILookupList interface looks pretty useless. My goal is to get the test to compile and pass, and these interfaces satisfy the test's requirements. It's time to shift focus to the object that I'm actually testing—the ViewCustomerPresenter. This class does not exist yet, but looking at the test you can glean two important facts about it: it has a constructor that requires both a view and service implementation as dependencies, and it has a void Initialize method. The code in Figure 5 shows how to compile the test.
Figure 5 Compiling the Test
public class ViewCustomerPresenter
{
private readonly IViewCustomerView view;
private readonly ICustomerTask task;
public ViewCustomerPresenter(
IViewCustomerView view, ICustomerTask task)
{
this.view = view;
this.task = task;
}
public void Initialize()
{
throw new NotImplementedException();
}
}
Remember that a presenter requires all of its dependencies in order to do its work meaningfully; this is why the view and service are passed in. I have not implemented the initialize method so if I run the test I get a NotImplementedException.
As mentioned already, I am not coding the presenter blindly; I already know, from looking at the test, what behavior the presenter should exhibit once the initialize method is called. The implementation of that behavior is as follows:
public void Initialize()
{
task.GetCustomerList().BindTo(view.CustomerList);
}
In the source code accompanying this article there is a complete implementation of the GetCustomerList method in the CustomerTask class (which implements the ICustomerTask interface). From the perspective of implementing and testing the presenter, though, I don't need to know whether there is a working implementation yet. It is this level of abstraction that allows me to plow through with the testing of the presenter class. The first test is now in a state that will compile and run. This proves that when the Initialize method on the presenter is called, it will interact with its dependencies in the manner that I specified in the test, and ultimately when the concrete implementations of those dependencies are injected into the presenter, I can be sure that the resulting view (the ASPX page) will be filled with a list of Customers.
Filling the DropDownList
So far I have been dealing mainly with interfaces to abstract the actual implementation details away, allowing the focus to be on the presenter. It is now time to build some of the plumbing that will ultimately allow the presenter to populate a list on a Web page in a way that can be tested. The key to making this work is the interaction that will occur in the BindTo method of the LookupCollection class. If you take a look at the implementation of the LookupCollection class in Figure 6, you will notice that it implements the ILookupCollection interface. The source code for the article has the accompanying tests that were used to build up the functionality of the LookupCollection class.
Figure 6 The LookupCollection Class
public class LookupCollection : ILookupCollection
{
private IList
public LookupCollection(IEnumerable
{
this.items = new List
}
public int Count { get { return items.Count; } }
public void BindTo(ILookupList list)
{
list.Clear();
foreach (ILookupDTO dto in items) list.Add(dto);
}
}
The implementation of the BindTo method is of particular interest. Notice that in this method the collection iterates through its own private list of ILookupDTO implementations. An ILookupDTO is an interface that caters well to binding to comboboxes in the UI layer:
public interface ILookupDTO
{
string Value { get; }
string Text { get; }
}
Figure 7 shows the code that tests the lookup collection's BindTo method, which will help explain the expected interaction between a LookupCollection and an ILookupList. The last line is of particular interest. In this test I expect that before attempting to add items to the list, the LookupCollection will invoke the Clear method on the ILookupList implementation. I then expect Add to be called on an ILookupList 10 times, and as an argument to the Add method, the LookupCollection will pass in an object that implements the ILookupDTO interface. To make this actually work with a control that lives in a Web project (such as a dropdown listbox) you will need to create an implementation of ILookupList that knows how to work with controls in a Web project.
Figure 7 A Test that Describes Behavior
[Test]
public void ShouldBeAbleToBindToLookupList()
{
IList
ILookupList mockLookupList = mockery.NewMock
Expect.Once.On(mockLookupList).Method("Clear");
for (int i = 0; i < 10; i++)
{
SimpleLookupDTO dto =
new SimpleLookupDTO(i.ToString(),i.ToString());
dtos.Add(dto);
Expect.Once.On(mockLookupList).Method("Add").With(dto);
}
new LookupCollection(dtos).BindTo(mockLookupList);
}
The source code that accompanies this article contains a project named MVP.Web.Controls. This project contains any Web-specific controls or classes that I chose to create to complete the solution. Why did I place the code in this project and not in the APP_CODE directory or the Web project itself? Testability. Anything that lives in the Web project is difficult to test directly without either running the application manually or automating the UI using some sort of testing robot. The MVP pattern allows me to think at a higher level of abstraction and test implementations of the core interfaces (ILookupList and ILookupCollection) without manually running the application. I am going to add a new class, a WebLookupList control, to the Web.Controls project. Figure 8 shows the first test for this class.
Figure 8 First Test for WebLookupList Control
[Test]
public void ShouldAddItemToUnderlyingList()
{
ListControl webList = new DropDownList();
ILookupList list = new WebLookupList(webList);
SimpleLookupDTO dto = new SimpleLookupDTO("1","1");
list.Add(dto);
Assert.AreEqual(1, webList.Items.Count);
Assert.AreEqual(dto.Value, webList.Items[0].Value);
Assert.AreEqual(dto.Text, webList.Items[0].Text);
}
Some things stand out in the test that is shown in Figure 8. The test project clearly needs a reference to the System.Web library so that it can instantiate DropDownList Web controls. Looking at the test, you should see that the WebLookupList class will implement the ILookupList interface. It is also going to take a ListControl as a dependency. Two of the most common ListControl implementations in the System.Web.UI.WebControls namespace are the DropDownList and the ListBox classes. A key feature of the test in Figure 8 is the fact that I am ensuring that a WebLookupList correctly updates the state of an actual Web ListControl to which it is delegating responsibility. Figure 9 shows the class diagram for the classes involved in the WebLookupList implementation. I can satisfy the requirements of the first test for the WebLookupList control with the code in Figure 10.
Figure 10 WebLookupList Control
public class WebLookupList : ILookupList
{
private ListControl underlyingList;
public WebLookupList(ListControl underlyingList)
{
this.underlyingList = underlyingList;
}
public void Add(ILookupDTO dto)
{
underlyingList.Items.Add(new ListItem(dto.Text, dto.Value));
}
}
.gif)
Figure 9 WebLookupList Class
Remember, one of the keys to MVP is the separation of layers introduced by the creation of a view interface. The presenter doesn't know what implementation of a view, and respectively an ILookupList, it will be talking to; it just knows that it will be able to call any of the methods defined by those interfaces. Ultimately, the WebLookupList class is a class that wraps and delegates to an underlying ListControl (base class for some of the ListControls defined in the System.Web.UI.WebControls project). With that code now in place, I can compile and run the WebLookupList control test which should pass. I can add one more test for the WebLookupList that tests the actual behavior of the clear method:
[Test]
public void ShouldClearUnderlyingList()
{
ListControl webList = new DropDownList();
ILookupList list = new WebLookupList(webList);
webList.Items.Add(new ListItem("1", "1"));
list.Clear();
Assert.AreEqual(0, webList.Items.Count);
}
Again I am testing that the WebLookupList class will actually change the state of the underlying ListControl (DropDownList) when its own methods are invoked. The WebLookupList is now feature complete for the purposes of populating a DropDownList in a Web Form. It is now time for me to wire everything together and get the Web page's dropdown filled with a list of customers.
Implementing the View Interface
Because I am building a Web Forms front end, it makes sense that the implementer for the IViewCustomerView interface would be a Web Form or a user control. For the purpose of this column, I'll make it a Web Form. The general appearance of the page has already been created, as you saw in Figure 2. Now I need only to implement the view interface. Switching to the codebehind for the ViewCustomers.aspx page, I can add the following code, indicating that the page is required to implement the IViewCustomersView interface:
public partial class ViewCustomers : Page,IViewCustomerView
If you look at the code sample, you'll notice that the Web project and the Presentation are two completely different assemblies. Also, the Presentation project has no reference whatsoever to the Web.UI project, further maintaining the layer of separation. On the other hand, the Web.UI project has to have a reference to the Presentation project, as that is where the View interface and the presenter live.
By choosing to implement the IViewCustomerView interface, our Web page now has a responsibility to implement any methods or properties defined by that interface. Currently there is only one property on the IViewCustomerView interface and that is a getter that returns any implementation of an ILookupList interface. I added a reference to the Web.Controls project so that I can instantiate a WebLookupListControl. I did this because the WebLookupListControl implements the ILookupList interface and it knows how to delegate to actual WebControls that live in ASP.NET. Taking a look at the ASPX for the ViewCustomer page, you will see that the list of customers is simply an asp:DropDownList control:
With this already in place, I can quickly continue to implement the code required to satisfy the implementation of the IViewCustomerView interface:
public ILookupList CustomerList
{
get { return new WebLookupList(this.customerDropDownList);}
}
I now need to invoke the Initialize method on the presenter that will trigger it to actually do some work. To do that, the view needs to be able to instantiate the presenter so that methods on it can be invoked. If you look back to the presenter, you'll remember that it requires both a view and a service that it will work with. The ICustomerTask interface represents an interface that lives in the service layer of the application. Service layers are typically responsible for orchestrating the interaction between domain objects and converting the results of those interactions into Data Transfer Objects (DTOs) that are then passed from the service layer to the presentation layer and then to the UI layer. There is a problem, however—I have stipulated that the presenter needs to be constructed with both the view and service implementations.
The actual instantiation of the presenter is going to take place in the codebehind for the Web page. This is a problem, because the UI project has no reference to the service layer project. The presentation project does, however, have a reference to the service layer project. This allows me to solve the problem by adding an overloaded constructor to the ViewCustomerPresenterClass:
public ViewCustomerPresenter(IViewCustomerView view) :
this(view, new CustomerTask()) {}
This new constructor satisfies the presenter's requirement for implementations of both the view and the service, while also maintaining the separation of the UI layer from the service layer. It is now fairly trivial to finish off the code for the codebehind:
protected override void OnInit(EventArgs e)
{
base.OnInit(e);
presenter = new ViewCustomerPresenter(this);
}
protected void Page_Load(object sender, EventArgs e)
{
if (!IsPostBack) presenter.Initialize();
}
Notice the key to the instantiation of the presenter is the fact that I am making use of the newly created overload for the constructor, and the Web Form passes itself in as an object that implements the view interface!
With the code for the codebehind implemented, I can now build and run the application. The DropDownList on the Web page is now filled with a list of customer names without the need for any databinding code in the codebehind. Plus, scores of tests have been run on all the pieces that ultimately work together, ensuring that the presentation layer architecture will behave as expected.
I'm going to wrap up my discussion of MVP by showing what is required to display customer information for a customer selected in the DropDownList. Once again, I start by writing a test that describes the behavior I hope to observe (see Figure 11).
Figure 11 One Last Test
[Test]
public void ShouldDisplayCustomerDetails()
{
SimpleLookupDTO lookupDTO = new SimpleLookupDTO("1","JPBOO");
CustomerDTO dto = new CustomerDTO("BLAH", "BLAHCOMPNAME",
"BLAHCONTACTNAME", "BLAHCONTACTTILE", "ADDRESS", "CITY",
"REGION", "POSTALCODE", Country.CANADA, "4444444", "4444444");
Expect.Once.On(mockViewCustomerView).GetProperty(
"CustomerList").Will(Return.Value(mockCustomerLookupList));
Expect.Once.On(mockCustomerLookupList).GetProperty(
"SelectedItem").Will(Return.Value(lookupDTO));
Expect.Once.On(mockCustomerTask).Method(
"GetDetailsForCustomer").With(1).Will(Return.Value(dto));
Expect.Once.On(mockViewCustomerView).SetProperty(
"CompanyName").To(dto.CompanyName);
Expect.Once.On(mockViewCustomerView).SetProperty(
"ContactName").To(dto.ContactName);
Expect.Once.On(mockViewCustomerView).SetProperty(
"ContactTitle").To(dto.ContactTitle);
Expect.Once.On(mockViewCustomerView).SetProperty(
"Address").To(dto.Address);
Expect.Once.On(mockViewCustomerView).SetProperty(
"City").To(dto.City);
Expect.Once.On(mockViewCustomerView).SetProperty(
"Region").To(dto.Region);
Expect.Once.On(mockViewCustomerView).SetProperty(
"PostalCode").To(dto.PostalCode);
Expect.Once.On(mockViewCustomerView).SetProperty(
"Country").To(dto.CountryOfResidence.Name);
Expect.Once.On(mockViewCustomerView).SetProperty(
"Phone").To(dto.Phone);
Expect.Once.On(mockViewCustomerView).SetProperty("Fax").To(dto.Fax);
presenter.DisplayCustomerDetails();
}
As before, I am taking advantage of the NMock library to create mocks of the task and view interfaces. This particular test verifies the behavior of the presenter by asking the service layer for a DTO representing a particular customer. Once the presenter retrieves the DTO from the service layer, it will update properties on the view directly, thus eliminating the need for the view to have any knowledge of how to correctly display the information from the object. For brevity I am not going to discuss the implementation of the SelectedItem property on the WebLookupList control; instead I will leave it to you to examine the source code to see the implementation details. What this test really demonstrates is the interaction that occurs between the presenter and the view once the presenter retrieves a CustomerDTO from the service layer. If I attempt to run the test now, I will be in a big failure state as a lot of the properties don't yet exist on the view interface. So I'll go ahead and add the necessary members to the IViewCustomerView interface, as you see in Figure 12.
Figure 12 Completing the IVewCustomerView Interface
public interface IViewCustomerView
{
ILookupList CustomerList{get;}
string CompanyName{set;}
string ContactName{set;}
string ContactTitle{set;}
string Address{set;}
string City{set;}
string Region{set;}
string PostalCode{set;}
string Country{set;}
string Phone{set;}
string Fax{set;}
}
Immediately after adding these interface members, my Web Form complains because it is no longer fulfilling the contract of the interface, so I have to go back to the codebehind for my Web Form and implement the remaining members. As stated before, the entire markup for the Web page has already been created, as have the table cells which have been marked with the "runat=server" attribute and are named according to the information that should be displayed in them. This makes the resulting code to implement the interface members very trivial:
public string CompanyName
{
set { this.companyNameLabel.InnerText = value; }
}
public string ContactName
{
set { this.contactNameLabel.InnerText = value; }
}
...
With the setter properties implemented, there is just one thing left to do. I need a way to tell the presenter to display the information for the selected customer. Looking back at the test, you can see that the implementation of this behavior will live in the DisplayCustomerDetails method on the presenter. This method will not, however, take any arguments. When invoked, the presenter will turn back around to the view, pull from it any information it needs (which it will retrieve by using the ILookupList), and then use that information to retrieve the details about the customer in question. All that I need to do from a UI perspective is set the AutoPostBack property of the DropDownList to true, and I also need to add the following event handler hookup code to the OnInit method of the page:
protected override void OnInit(EventArgs e)
{
base.OnInit(e);
presenter = new ViewCustomerPresenter(this);
this.customerDropDownList.SelectedIndexChanged += delegate
{
presenter.DisplayCustomerDetails();
};
}
This event handler ensures that whenever a new customer is selected in the dropdown, the view will ask the presenter to display the details for that customer.
It is important to note that this is typical behavior. When a view asks a presenter to do something, it asks without giving any specific details, and it is up to the presenter to return to the view and get any information it needs using the view interface. Figure 13 shows the code required to implement the required behavior in the presenter.
Figure 13 Completing the Presenter
public void DisplayCustomerDetails()
{
int? customerId = SelectedCustomerId;
if (customerId.HasValue)
{
CustomerDTO customer =
task.GetDetailsForCustomer(customerId.Value);
UpdateViewFrom(customer);
}
}
private int? SelectedCustomerId
{
get
{
string selectedId = view.CustomerList.SelectedItem.Value;
if (String.IsNullOrEmpty(selectedId)) return null;
int? id = null;
try
{
id = int.Parse(selectedId.Trim());
}
catch (FormatException) {}
return id;
}
}
private void UpdateViewFrom(CustomerDTO customer)
{
view.CompanyName = customer.CompanyName;
view.ContactName = customer.ContactName;
view.ContactTitle = customer.ContactTitle;
view.Address = customer.Address;
view.City = customer.City;
view.Region = customer.Region;
view.Country = customer.CountryOfResidence.Name;
view.Phone = customer.Phone;
view.Fax = customer.Fax;
view.PostalCode = customer.PostalCode;
}
Hopefully you now see the value of adding the presenter layer. It is the presenter's responsibility to attempt to retrieve an ID for a customer for whom it needs to display details. This is code that would normally have been performed in the codebehind, but is now inside a class that I can fully test and exercise outside of any presentation-layer technology.
In the event that the presenter can retrieve a valid customer ID from the view, it turns to the service layer and asks for a DTO that represents the details for the customer. Once the presenter has the DTO in hand, it updates the view with the information contained in the DTO. A key point to note is the simplicity of the view interface; aside from the ILookupList interface, the view interface consists entirely of string DataTypes. It is ultimately the responsibility of the presenter to correctly convert and format the information retrieved from the DTO so that it can actually be handed to the view as a string. Although not demonstrated in this example, the presenter would also be responsible for reading information from the view and converting it to the necessary types that the service layer would expect.
With all the pieces in place I can now run the application. When the page first loads, I get a list of customers and the first customer appears (not selected) in the DropDownList. If I select a customer, a postback occurs, the interaction between the view and the presenter takes place, and the Web page is updated with the related customer information.
What's Next?
The Model View Presenter design pattern is really just a fresh take on the Model View Controller pattern that many developers are already familiar with; the key distinction is that MVP truly separates the UI from the domain/service layer of the application. Although this example was fairly simple from a requirements perspective, it should help you abstract the interaction between a UI and the other layers of your applications. Also, you should now see ways that you can use these layers of indirection to make your application more testable with automation. As you delve deeper into the MVP pattern, I hope you'll find other ways to pull as much formatting and conditional logic out of your codebehinds and place them into testable view/presenter interaction models.
Monday, July 20, 2009
Title Time Script
This script displays the live time in the title of your surfer's browser! It does not erase the default title of the document, but rather, simply appends the time to it. Like the Title date script, the script manipulates the IE 4+ and NS6+ exclusive document.title property, so it's only visible to IE 4+/NS6+ browsers.
<script language="JavaScript" type="text/javascript">
var scroller;
var ampm;
var actualtitle=document.title+" "
function antiMilitaryTime()
{
if (hr == "12"){
ampm="P.M."
}
else if (hr == "13"){
hr="1"
ampm="P.M."
}
else if (hr == "14"){
hr="2"
ampm="P.M."
}
else if (hr == "15"){
hr ="3"
ampm="P.M."
}
else if (hr == "16"){
hr = "4"
ampm="P.M."
}
else if (hr == "17"){
hr = "5"
ampm="P.M."
}
else if (hr == "18"){
hr = "6"
ampm="P.M."
}
else if (hr == "19"){
hr = "7"
ampm="P.M."
}
else if (hr == "20"){
hr = "8"
ampm="P.M."
}
else if (hr == "21"){
hr = "9"
ampm="P.M."
}
else if (hr == "22"){
hr = "10"
ampm="P.M."
}
else if (hr == "23"){
hr = "11"
ampm="P.M."
}
else if (hr == "24"){
hr = "12"
}
}
function addZero(){
if (min <= "9"){
min = "0"+min
}
if (sec<= "9"){
sec = "0"+sec
}
if (hr <=9){
hr = "0"+hr
}
}
function time(){
dt=new Date()
sec=dt.getSeconds()
hr=dt.getHours()
ampm="A.M."
min=dt.getMinutes()
}
function scroll() {
time()
antiMilitaryTime()
addZero()
var scroller="TIME: "+hr+":"+min+":"+sec+" "+ampm
var timeout=setTimeout("scroll()", 1000)
document.title=actualtitle+scroller
}
if (document.all||document.getElementById)
scroll()
</script&rt;
Thursday, July 16, 2009
How to find the current IIS version installed in your system
Hi All
I was wondering the other day where i could find my IIS Version number and once when i was looking at the documentation provided then i noticed that the simplest way to find out the version number is by simply typing the URL
http://localhost/iisHelp/iis/misc/default.asp
Thats it...
Regards
Mansoor Ali
Tuesday, July 7, 2009
Building an N-Tier Application in .NET
Building an N-Tier Application in .NET
Upgrading to Microsoft .NET
Paul D. Sheriff
PDSA, Inc.
February 2002
Summary: After reviewing the types of n-tier applications, you'll learn how to create a typed dataset that can return data from a Web service and consume a Web service from a Windows application. (17 printed pages)
Objectives
· Review the types of n-tier applications.
· Review the goals of a good n-tier application.
· Learn how to create a typed dataset that can return data from a Web service.
· Consume a Web service from a Windows application.
Assumptions
· You have developed an n-tier application.
· You are very familiar with classes.
· You have used the OleDbDataAdapter and DataSets.
· You know how to create a Typed DataSet.
· You can create a form in Microsoft® Visual Studio® .NET.
· You are familiar with relational databases and Microsoft ADO.NET.
· You have created a Web service in Microsoft® .NET.
Contents
Types of N-Tier Applications
Creating an N-Tier Application
What's Different from Visual Basic 6.0?
Summary
Types of N-Tier Applications
There are many types of n-tier applications that programmers have developed over the years. Since classes were first introduced in Microsoft Visual Basic® 4.0, many programmers have attempted to come up with the definitive method of creating n-tier applications. Although all of them are clever, there has never been a consensus on how every n-tier application should be constructed. As many programmers as there are in the world, there seem to be that many methods of developing n-tier applications. Below is a list of some of the possible ways.
· Create a component with one class that returns a disconnected ADO recordset for any SQL statement sent to it. All updates are performed in the ADO recordset, then passed back to the component for batch updating.
· Create a component that has many classes based around business processes. All data for the business process is passed to this component. The component will update the appropriate tables from the data supplied. Another component would be used to return views of data needed to support the user interface for a business process.
· Create one class per table using ADO embedded into the class. This is a logical n-tier model where both the EXE and the classes (in a DLL) are installed on the client machine.
· Create one class per table using ADO on the client side. This client-side class passes SQL through DCOM to a server-side Data Class running under MTS that returns a disconnected ADO recordset to the client side.
· Create two classes per table, one with properties that can be set from the client side EXE. These properties are then bundled into an XML string and passed across DCOM to a server-side class running under MTS. The XML contains instructions on how to gather or modify the data, and a disconnected ADO recordset is returned back to the client-side class.
· Create one class per table using a DOMDocument object on the client side to process all the data. The client-side class bundles up properties into an XML string that is then sent to a server-side data class. The server side extracts the instructions (the SQL) from the XML and performs the appropriate action on the database server. The server-side class then returns XML to the client-side class to inform the client what happened on the database. In this scenario, there is only one data class for all tables.
· Create one server-side class for all tables. The client side passes SQL to the server-side class and it returns a disconnected ADO recordset. All forms then use these ADO recordsets for processing data.
· Create a client-side EXE that sends a SOAP request to a Web server for XML data. XML is processed on the client side using the DOMDocument object.
As you can see, there are many different methods for creating an n-tier application. They all work, and they each have advantages and disadvantages. The goal of this document is not to dispute any of these, nor to look at the advantages and disadvantages, but to simply present a way to create n-tier data classes within Visual Basic .NET.
In this document, you will learn to create a Typed DataSet using built-in tools in Visual Studio .NET. A Typed DataSet is inherited from the DataSet class in .NET. It also provides you with properties that match up to each column in the base table. You use a standard data adapter object to fill up the DataSet from the data source. The wizard that generates this Typed DataSet reads the schema information from the data source and maps these data types to each of the columns. This is why this is called a Typed DataSet.
A Typed DataSet will help you speed up your development process in a few ways. First, you no longer have to remember column names; you will have a Microsoft® InteliSense® list after creating an object from this DataSet class. This avoids run-time errors as column names can be checked at compile time. Second, you no longer have to see SQL in your front-end client application. All of the SQL is buried in the data adapter. By putting these Typed DataSets into a separate component, you are able to reuse these classes from multiple projects.
Goals of a Good N-Tier Application
N-tier design came about as a result of the failings of the client/server model. There are many goals that an n-tier application design should achieve. Here are some of them.
· If you change the underlying data access methods, the client-side code should not have to change.
· All data access routines should be exposed as objects instead of function calls. As an example, it is much easier to use ADO than the ODBC API calls.
· SQL should be eliminated from the client-side code. The client code should just be concerned with methods and properties.
· Table and column names should be eliminated from the client-side code. Typed datasets can present table and column names as properties, providing an IntelliSense list, as opposed to having to type in a string name. This means at compile time, checks can be made for data types and names of columns.
· The client code should not care where the data comes from. It should just care that it can retrieve and modify the data in some object and the object will take care of the details.
· The coding you need to do on the client side should be simplified. Instead of using many functions, your application should be able to use objects with properties and methods.
· It becomes easier to create and use the classes than the function calls.
· It becomes easier to add functionality to your applications, and change the functionality, without breaking the client-side code.
Disadvantages to N-Tier
Although there are many advantages to a good n-tier application, there are some disadvantages as well.
· You end up creating a lot of classes. This can lead to maintenance issues and could even be a performance issue as it does take time to create a new class at run time.
· N-tier does not work well when you do not know the structure of the tables from which you will be retrieving data. For example, in a Query By Example (QBE) application where the user may put together several columns from several tables, there is no way to generate classes on the fly to accomplish this.
· Creating reports is not something that lends itself to a good n-tier design, as report writers do not use classes to get at data.
In the end, the advantages of a good n-tier design will far outweigh the disadvantages. In the cases where you simply cannot use n-tier, go ahead and use the typical client/server method of development. There is certainly nothing wrong with mixing both of these paradigms in the same application if appropriate.
Creating an N-Tier Application
When you talk about a true distributed n-tier type of application, you are talking about separating the components of the different tiers on different machines as well as in separate components. Figure 1 shows a typical example of an n-tier application with multiple components on each machine.
Figure 1. A distributed n-tier application has three physical tiers with one or more logical tiers on each machine
There are many different ways you could configure an n-tier application. For example, the business rules may go on a separate machine and you might use .NET Remoting to talk from the client application to the business rule tier as shown in Figure 2.
Figure 2. Business rules can be placed on a separate machine to facilitate ease of maintenance
You may also have a data input validation rule component on the client to check simple rules such as required fields and formatting. These are rules that you do not want to make a trip across the network just to check. You may then also add a business rule layer on the same tier as the data layer component to check complicated business rules that compare the data from one table to another.
These are just a few different configurations that you may utilize. Of course, you could come up with something unique that fits your specific situation. Regardless of how you structure the physical implementation of the components, make sure that the logical structure of the program is broken up into components as shown in the above figures.
Creating the User Interface
In the example you see in Figure 1, the client tier consists of a Windows application and a business rule component. The Windows application makes all requests for data, and all updates through the business rule component. This isolates the location of the data from the Windows application. The advantage of doing this is if you change where the data comes from, you do not need to make any changes to the client application, only to the business rule component.
Figure 3. This is a DataGrid that has been bound to the return result from the business rules component
Perform the following steps to build a simple Windows client application that will display employee information in a DataGrid control on a Windows Form.
1. Create a new Windows Application project named EmpClient.
2. Rename the default form (Form1.vb) file name to frmEmpInfo.vb.
3. Set the form's Name property to EmpInfo.
4. Set the form's Text property to Employee Information.
5. Set the Startup Object in the Project Properties to EmpInfo.
6. Drag a DataGrid onto this form. Set the Name property to grdEmps.
7. Add a Button control to this form. Set the Name property to btnUpdate. Set the Text property to Update.
At this point, the user interface for your employee form is complete. Now it is time to start building the components so you can retrieve the data to populate this DataGrid.
Creating the Data Tier
The data tier is responsible for connecting to your data source, building a typed data set, and returning that data set from a method within this component.
Follow these steps to build a data tier component.
1. In the Solution Explorer window, right-click the solution named EmpClient.
2. On the shortcut menu, click Add, and then click New Project.
3. Choose the Class Library template. Set the name of this class library to EmpData.
4. Delete the class file named Class1.vb from the project.
5. To add a new component to the project, on the Project menu, click Add Component. Set the name of the component to clsEmp.vb.
6. View the code for this component and change the name of the class from clsEmp to Employees.
7. In the design view, click and drag a SqlDataAdapter control from the Data tab of the toolbox onto the design surface of this component.
8. Go through the steps of this wizard to connect to your SQL Server, pointing to the Northwind database on that server. Select all rows and columns from the Employee table within this database.
9. Rename the SqlConnection object from SqlConnection1 to cnNorthwind. Rename the SqlDataAdapter object from SqlDataAdapter1 to daEmps.
10. Click the daEmps object and, on the Data menu, click Generate DataSet. Set the name of the New DataSet to dsEmps.
At this point, you have a component with some data access objects on it. The reason to use a component instead of a regular class is that you need the ability to drag a Connection and DataAdapter object onto a design surface. A component will let you do this; a regular class will not. Of course, you could always just create your own data adapter and connection objects in code, but this way is much easier.
All that is left to do after adding this component is to add a couple of methods to the component. The first method, named GetData, returns a reference to the typed dataset filled with employee data. The second method, named Update, accepts a typed dataset as a parameter and submits the changes in this dataset to the backend data source.
The GetData Method in the Data Component
This method is responsible for declaring an object of the type dsEmps. Remember that this is the name of the typed dataset that you generated. This file is represented in the Solution Explorer window as dsEmps.xsd. This is the schema definition file for the Employees table from the Northwind database. The code behind this xsd file is the generated typed dataset named dsEmps.
Public Function GetData() As dsEmps
Dim dsData As dsEmps
Try
dsData = New dsEmps()
daEmps.Fill(dsData)
Return dsData
Catch
Throw
End Try
End Function
After creating the instance of the dsEmps object, you will use the SqlDataAdapter object to fill the dsEmps object with data from the Employees table. This typed dataset is then returned from the method to be consumed by some other component. You will learn how to consume this dataset in the next section.
The Update Method in the Data Component
The Update method accepts a typed dataset from a calling program, and performs the Update method on the SqlDataAdapter object to send any changes in the dataset to the Employees table. It also returns this same dataset back to the calling program so any updated fields, like TimeStamps or Identity fields, can be merged back into the dataset in the calling program.
Public Function Update(ByVal dsData As dsEmps) As dsEmps
Try
' Update Data In Table
daEmps.Update(dsData)
Catch
' Throw any exceptions back to client
Throw
End Try
Return dsData
End Function
Notice the use of the structured exception handling in both of these methods. If any errors are encountered, the exceptions are simply thrown back to the calling component for handling. No errors will be handled in these components.
Creating the Web Service
In Figure 1, you can see that the Data Tier is called from the Web service. You will now create the Web service project that calls the EmpData component that you just created.
1. In the Solution Explorer window, click the solution named EmpClient.
2. Right-click and on the shortcut menu, click Add, and then click New Project.
3. Select the ASP.NET Web service template and set the Name of this project to EmpWS.
4. Delete the Service1.asmx file from the project.
5. To add a new Web service file, on the Project menu, click Add Web service. Set the name of this new Web service to Employees.asmx.
6. Click the EmpWS project and add a reference to the EmpData project.
Now that you have created the Web service named Employees, you can create the two methods that will consume the dataset from the data component. You name these two methods the same name as the methods in the data component for consistency.
The GetData Method in the Web Service
The GetData method in the Web service creates a reference to the EmpData.Employees class. Once you have created this new object, invoke the GetData method on this object and return the dataset from this Web method.
Public Function GetData() _
As EmpData.dsEmps
Dim dc As EmpData.Employees
Try
dc = New EmpData.Employees()
Return dc.GetData
Catch
' Throw any exceptions back to client
Throw
End Try
End Function
Remember from the diagram in Figure 1 that the business rule component retrieves the data from this Web service. The reason you don't just create the typed data set in the Web service project is that you want the flexibility to use the data component directly from a Windows application if you are not going to be doing a true distributed application. So just by eliminating the Web service project, you can change the code in the business rule layer to talk directly to the data component instead of the Web service, and you do not have to change any other code.
The Update Method
The Update method in this Web service project simply passes the dataset that was passed in as an argument directly to the data component's Update method.
Public Function Update( _
ByVal dsData As EmpData.dsEmps) As EmpData.dsEmps
Dim dc As EmpData.Employees
Try
dc = New EmpData.Employees()
dc.Update(dsData)
Catch
' Throw any exceptions back to client
Throw
End Try
Return dsData
End Function
Creating the Business Rules Component
Now it is time to bring all of the projects together by hooking up the business rule component to the Windows application, and having the business rule component make the call to the Web service to retrieve the data.
Follow the steps below to create the component that acts as the interface between the Windows application and the data tier.
1. In the Solution Explorer window, right-click the EmpClient solution, and on the shortcut menu, click Add, and then click New Project.
2. Select the Class Library template and set the Name of this new project to EmpBusRule.
3. Rename the Class1.vb file to clsEmployee.vb.
4. Change the name of the Public Class from Class1 to Employees.
5. To ensure that the solution compiles and to also build the Web service files needed for referencing, on the Build menu, click Build Solution.
6. Click the EmpBusRule project and add a Web Reference to the EmpWS.vsdisco file.
Note If you cannot set a reference to the vsdisco file, set a reference to the Employees.asmx file instead.
7. Expand the Web References folder in this project and rename the LocalHost item (or whatever the name of your Web Server is) to EmpService.
The GetData Method in the Business Rules Component
The GetData method in the business rule component simply accesses the Web service component to request the data from the data tier. Although this seems to be an indirect approach to getting the data, it allows us to create a truly distributed approach to our n-tier application.
Public Function GetData() As EmpService.dsEmps
Dim ws As EmpService.Employees
Try
ws = New EmpService.Employees()
Return ws.GetData
Catch
Throw
End Try
End Function
The Update Method in the Business Rules Component
The Update method is responsible for taking the dataset of changes, checking to make sure that the business rules are not violated, and then pushing the data back across the HTTP interface to the Web service component.
Public Function Update( _
ByVal dsData As EmpService.dsEmps) As EmpService.dsEmps
Dim ws As EmpService.Employees
Try
ws = New EmpService.Employees()
' Check business Rules
Me.Check(dsData)
' Update Data In Table
ws.Update(dsData)
Catch
' Throw any exceptions back to client
Throw
End Try
Return dsData
End Function
The Check Method in the Business Rules Component
The Check method is where you put in any appropriate business rules that you need to check prior to inserting or updating any rows in the dataset.
Public Sub Check(ByVal dsData As EmpService.dsEmps)
Dim strMsg As String
Dim row As EmpService.dsEmps.EmployeesRow
' Check business rules
For Each row In dsData.Employees.Rows
If row.RowState = DataRowState.Added Or _
row.RowState = DataRowState.Modified Then
If row.FirstName.Trim() = "" Then
strMsg &= "First Name must be filled in" & _
ControlChars.CrLf
End If
If row.LastName.Trim() = "" Then
strMsg &= "Last Name must be filled in" & _
ControlChars.CrLf
End If
If row.HireDate < row.BirthDate Then
strMsg &= "Hire Date must be greater
than Birth Date" & _
ControlChars.CrLf
End If
End If
Next
If strMsg <> "" Then
' Throw a new ApplicationException
' with our custom error message in it
Throw New ApplicationException(strMsg)
End If
End Sub
Notice that you should check the RowState property to see whether the row has been added or updated. You do not need to check the row if it has been deleted. During the Check method you can see the benefit of using Typed Datasets. Instead of referencing a column name through an index in a Dataset you have an actual property name. This enforces type safety and gives you an IntelliSense list of column names so you do not have to look them up in your database.
Consuming the Data from the Windows Application
Now that you have all of the components hooked up together, it is time to make the Windows application consume data from the business rules component. Follow the steps below to make this work.
1. In the Solution Explorer window, click the EmpClient project.
2. Add a reference to the EmpBusRule project.
3. Bring up the code for the form and add the Private mdsEmps variable, as shown in the code below.
4. Public Class EmpInfo
5. Inherits System.Windows.Forms.Form
6.
Private mdsEmps As EmpBusRule.EmpService.dsEmps
This member variable on this form is a typed dataset that represents the Employees table in the Northwind database. You use this variable to fill the DataGrid control on the employee form.
Loading Data into the DataGrid
Next, you need to create the routine to load the DataGrid. First, you add code to the form's Load event procedure.
1. Double-click the form to display the Load event procedure.
2. Add the following code:
3. Private Sub EmpInfo_Load( _
4. ByVal sender As System.Object, _
5. ByVal e As System.EventArgs) Handles MyBase.Load
6. GridLoad()
End Sub
7. Create the GridLoad procedure immediately below the Load event procedure.
8. Public Sub GridLoad()
9. Dim br As EmpBusRule.Employees
10.
11. Try
12. br = New EmpBusRule.Employees()
13.
14. ' mdsEmps is a typed dataset on this form
15. mdsEmps = br.GetData
16.
17. grdEmps.DataMember = "Employees"
18. grdEmps.DataSource = mdsEmps
19.
20. Catch exp As Exception
21. MsgBox(exp.Message)
22.
23. End Try
End Sub
The GridLoad procedure declares a new business rule object. It then uses the GetData method in the business rule object to assign the new typed dataset mdsEmps. You assign the table name to the DataMember and the dataset object to the DataSource property of the DataGrid control.
You should now be able to run this application, and if you have done everything correctly, the DataGrid should be loaded with employee data.
1. Set the EmpClient project as the Startup Project if it is not already.
2. Press F5 to run the application.
You should now see employee data in the list box that looks like Figure 2.
Updating Data from the DataGrid
You will now create the procedure under the Update button on the form to take any changes you make to the data in the grid and push them back to the data tier. Of course, you will first push the changes to the DataSet through the business rules component, which then sends the data through the Web service component, and then finally to the data tier component. The data tier component then connects up to the SQL Server and pushes the changes to the server.
Private Sub btnUpdate_Click( _
ByVal sender As System.Object, _
ByVal e As System.EventArgs) Handles btnUpdate.Click
Dim br As New EmpBusRule.Employees()
Dim dsChanges As New EmpBusRule.EmpService.dsEmps()
Dim strMsg As String
Try
If mdsEmps.HasChanges Then
dsChanges.Merge(mdsEmps.GetChanges())
MsgBox("Count = " & _
CStr(dsChanges.Employees.Rows.Count))
' Update the Data on the Server
dsChanges = br.Update(dsChanges)
MsgBox("Data Has Been Updated Successfully")
' You can either merge the changes back
' in and accept the changes, or you can
' reload the data from the table. I prefer
' reloading as it gets all the other
' changes by all other users.
'mdsEmps.Merge(dsChanges)
'mdsEmps.AcceptChanges()
' If everything is OK, refresh all data
' from the web service.
GridLoad()
Else
MsgBox("No changes have been made
to the data")
End If
Catch exp As ApplicationException
MsgBox(exp.Message)
Catch exp As Exception
MsgBox(exp.Message)
End Try
End Sub
The first part of this event procedure checks to see whether any changes have even been made to the DataSet. If they have, you get the changed data rows by using the GetChanges method of the DataSet class. This will return just those rows that were changed in the DataGrid.
Once you have this short list of rows from the dataset you can submit that to the Update method of the business rule component. The business rule component then sends it to the Web service component, which sends it on to the data tier component, and finally updates SQL Server. If any changes are made to the rows in the dataset (such as a TimeStamp field updating, or an identity field updating), these rows are passed back to this procedure. You can then either merge the data back into the main dataset, or you could simply reload the entire dataset directly from the database (going through the components of course).
When attempting to submit the changes to the back end, there could be a business rule that is violated. For example, if someone deletes the first name of an employee, the business rule that checks for the existence of the first name in a row of data will fail. This will be thrown as an ApplicationException object. You should check for this type of exception first, then display the error message returned, as that will be the description of the business rule or rules that are in violation.
The last thing you have to check for is any generic exceptions. For example, the database server might be down, and thus a regular exception might be thrown. Or maybe a concurrency exception is thrown because you updated a row and another user updated a row just before you did.
What's Different from Visual Basic 6.0?
Although the concepts for designing an n-tier application are pretty much the same as they have always been, the implementation is quite different. You should find that the amount of code you have to write is significantly reduced due to the advancements in Web services and ADO.NET.
Summary
In this document, you learned how to put together an n-tier application. Although you are shown just one of the many ways you could accomplish this, the format used here is very simple and easy to create. While the component you build here may be created on one machine, you can easily move the components from one machine to another and scale this solution using .NET Remoting and Web services. Whether you choose a logical or a physical implementation for your applications, you should always strive to develop your application using separate components for each process.
Upgrading to Microsoft .NET
Paul D. Sheriff
PDSA, Inc.
February 2002
Summary: After reviewing the types of n-tier applications, you'll learn how to create a typed dataset that can return data from a Web service and consume a Web service from a Windows application. (17 printed pages)
Objectives
· Review the types of n-tier applications.
· Review the goals of a good n-tier application.
· Learn how to create a typed dataset that can return data from a Web service.
· Consume a Web service from a Windows application.
Assumptions
· You have developed an n-tier application.
· You are very familiar with classes.
· You have used the OleDbDataAdapter and DataSets.
· You know how to create a Typed DataSet.
· You can create a form in Microsoft® Visual Studio® .NET.
· You are familiar with relational databases and Microsoft ADO.NET.
· You have created a Web service in Microsoft® .NET.
Contents
Types of N-Tier Applications
Creating an N-Tier Application
What's Different from Visual Basic 6.0?
Summary
Types of N-Tier Applications
There are many types of n-tier applications that programmers have developed over the years. Since classes were first introduced in Microsoft Visual Basic® 4.0, many programmers have attempted to come up with the definitive method of creating n-tier applications. Although all of them are clever, there has never been a consensus on how every n-tier application should be constructed. As many programmers as there are in the world, there seem to be that many methods of developing n-tier applications. Below is a list of some of the possible ways.
· Create a component with one class that returns a disconnected ADO recordset for any SQL statement sent to it. All updates are performed in the ADO recordset, then passed back to the component for batch updating.
· Create a component that has many classes based around business processes. All data for the business process is passed to this component. The component will update the appropriate tables from the data supplied. Another component would be used to return views of data needed to support the user interface for a business process.
· Create one class per table using ADO embedded into the class. This is a logical n-tier model where both the EXE and the classes (in a DLL) are installed on the client machine.
· Create one class per table using ADO on the client side. This client-side class passes SQL through DCOM to a server-side Data Class running under MTS that returns a disconnected ADO recordset to the client side.
· Create two classes per table, one with properties that can be set from the client side EXE. These properties are then bundled into an XML string and passed across DCOM to a server-side class running under MTS. The XML contains instructions on how to gather or modify the data, and a disconnected ADO recordset is returned back to the client-side class.
· Create one class per table using a DOMDocument object on the client side to process all the data. The client-side class bundles up properties into an XML string that is then sent to a server-side data class. The server side extracts the instructions (the SQL) from the XML and performs the appropriate action on the database server. The server-side class then returns XML to the client-side class to inform the client what happened on the database. In this scenario, there is only one data class for all tables.
· Create one server-side class for all tables. The client side passes SQL to the server-side class and it returns a disconnected ADO recordset. All forms then use these ADO recordsets for processing data.
· Create a client-side EXE that sends a SOAP request to a Web server for XML data. XML is processed on the client side using the DOMDocument object.
As you can see, there are many different methods for creating an n-tier application. They all work, and they each have advantages and disadvantages. The goal of this document is not to dispute any of these, nor to look at the advantages and disadvantages, but to simply present a way to create n-tier data classes within Visual Basic .NET.
In this document, you will learn to create a Typed DataSet using built-in tools in Visual Studio .NET. A Typed DataSet is inherited from the DataSet class in .NET. It also provides you with properties that match up to each column in the base table. You use a standard data adapter object to fill up the DataSet from the data source. The wizard that generates this Typed DataSet reads the schema information from the data source and maps these data types to each of the columns. This is why this is called a Typed DataSet.
A Typed DataSet will help you speed up your development process in a few ways. First, you no longer have to remember column names; you will have a Microsoft® InteliSense® list after creating an object from this DataSet class. This avoids run-time errors as column names can be checked at compile time. Second, you no longer have to see SQL in your front-end client application. All of the SQL is buried in the data adapter. By putting these Typed DataSets into a separate component, you are able to reuse these classes from multiple projects.
Goals of a Good N-Tier Application
N-tier design came about as a result of the failings of the client/server model. There are many goals that an n-tier application design should achieve. Here are some of them.
· If you change the underlying data access methods, the client-side code should not have to change.
· All data access routines should be exposed as objects instead of function calls. As an example, it is much easier to use ADO than the ODBC API calls.
· SQL should be eliminated from the client-side code. The client code should just be concerned with methods and properties.
· Table and column names should be eliminated from the client-side code. Typed datasets can present table and column names as properties, providing an IntelliSense list, as opposed to having to type in a string name. This means at compile time, checks can be made for data types and names of columns.
· The client code should not care where the data comes from. It should just care that it can retrieve and modify the data in some object and the object will take care of the details.
· The coding you need to do on the client side should be simplified. Instead of using many functions, your application should be able to use objects with properties and methods.
· It becomes easier to create and use the classes than the function calls.
· It becomes easier to add functionality to your applications, and change the functionality, without breaking the client-side code.
Disadvantages to N-Tier
Although there are many advantages to a good n-tier application, there are some disadvantages as well.
· You end up creating a lot of classes. This can lead to maintenance issues and could even be a performance issue as it does take time to create a new class at run time.
· N-tier does not work well when you do not know the structure of the tables from which you will be retrieving data. For example, in a Query By Example (QBE) application where the user may put together several columns from several tables, there is no way to generate classes on the fly to accomplish this.
· Creating reports is not something that lends itself to a good n-tier design, as report writers do not use classes to get at data.
In the end, the advantages of a good n-tier design will far outweigh the disadvantages. In the cases where you simply cannot use n-tier, go ahead and use the typical client/server method of development. There is certainly nothing wrong with mixing both of these paradigms in the same application if appropriate.
Creating an N-Tier Application
When you talk about a true distributed n-tier type of application, you are talking about separating the components of the different tiers on different machines as well as in separate components. Figure 1 shows a typical example of an n-tier application with multiple components on each machine.
Figure 1. A distributed n-tier application has three physical tiers with one or more logical tiers on each machine
There are many different ways you could configure an n-tier application. For example, the business rules may go on a separate machine and you might use .NET Remoting to talk from the client application to the business rule tier as shown in Figure 2.
Figure 2. Business rules can be placed on a separate machine to facilitate ease of maintenance
You may also have a data input validation rule component on the client to check simple rules such as required fields and formatting. These are rules that you do not want to make a trip across the network just to check. You may then also add a business rule layer on the same tier as the data layer component to check complicated business rules that compare the data from one table to another.
These are just a few different configurations that you may utilize. Of course, you could come up with something unique that fits your specific situation. Regardless of how you structure the physical implementation of the components, make sure that the logical structure of the program is broken up into components as shown in the above figures.
Creating the User Interface
In the example you see in Figure 1, the client tier consists of a Windows application and a business rule component. The Windows application makes all requests for data, and all updates through the business rule component. This isolates the location of the data from the Windows application. The advantage of doing this is if you change where the data comes from, you do not need to make any changes to the client application, only to the business rule component.
Figure 3. This is a DataGrid that has been bound to the return result from the business rules component
Perform the following steps to build a simple Windows client application that will display employee information in a DataGrid control on a Windows Form.
1. Create a new Windows Application project named EmpClient.
2. Rename the default form (Form1.vb) file name to frmEmpInfo.vb.
3. Set the form's Name property to EmpInfo.
4. Set the form's Text property to Employee Information.
5. Set the Startup Object in the Project Properties to EmpInfo.
6. Drag a DataGrid onto this form. Set the Name property to grdEmps.
7. Add a Button control to this form. Set the Name property to btnUpdate. Set the Text property to Update.
At this point, the user interface for your employee form is complete. Now it is time to start building the components so you can retrieve the data to populate this DataGrid.
Creating the Data Tier
The data tier is responsible for connecting to your data source, building a typed data set, and returning that data set from a method within this component.
Follow these steps to build a data tier component.
1. In the Solution Explorer window, right-click the solution named EmpClient.
2. On the shortcut menu, click Add, and then click New Project.
3. Choose the Class Library template. Set the name of this class library to EmpData.
4. Delete the class file named Class1.vb from the project.
5. To add a new component to the project, on the Project menu, click Add Component. Set the name of the component to clsEmp.vb.
6. View the code for this component and change the name of the class from clsEmp to Employees.
7. In the design view, click and drag a SqlDataAdapter control from the Data tab of the toolbox onto the design surface of this component.
8. Go through the steps of this wizard to connect to your SQL Server, pointing to the Northwind database on that server. Select all rows and columns from the Employee table within this database.
9. Rename the SqlConnection object from SqlConnection1 to cnNorthwind. Rename the SqlDataAdapter object from SqlDataAdapter1 to daEmps.
10. Click the daEmps object and, on the Data menu, click Generate DataSet. Set the name of the New DataSet to dsEmps.
At this point, you have a component with some data access objects on it. The reason to use a component instead of a regular class is that you need the ability to drag a Connection and DataAdapter object onto a design surface. A component will let you do this; a regular class will not. Of course, you could always just create your own data adapter and connection objects in code, but this way is much easier.
All that is left to do after adding this component is to add a couple of methods to the component. The first method, named GetData, returns a reference to the typed dataset filled with employee data. The second method, named Update, accepts a typed dataset as a parameter and submits the changes in this dataset to the backend data source.
The GetData Method in the Data Component
This method is responsible for declaring an object of the type dsEmps. Remember that this is the name of the typed dataset that you generated. This file is represented in the Solution Explorer window as dsEmps.xsd. This is the schema definition file for the Employees table from the Northwind database. The code behind this xsd file is the generated typed dataset named dsEmps.
Public Function GetData() As dsEmps
Dim dsData As dsEmps
Try
dsData = New dsEmps()
daEmps.Fill(dsData)
Return dsData
Catch
Throw
End Try
End Function
After creating the instance of the dsEmps object, you will use the SqlDataAdapter object to fill the dsEmps object with data from the Employees table. This typed dataset is then returned from the method to be consumed by some other component. You will learn how to consume this dataset in the next section.
The Update Method in the Data Component
The Update method accepts a typed dataset from a calling program, and performs the Update method on the SqlDataAdapter object to send any changes in the dataset to the Employees table. It also returns this same dataset back to the calling program so any updated fields, like TimeStamps or Identity fields, can be merged back into the dataset in the calling program.
Public Function Update(ByVal dsData As dsEmps) As dsEmps
Try
' Update Data In Table
daEmps.Update(dsData)
Catch
' Throw any exceptions back to client
Throw
End Try
Return dsData
End Function
Notice the use of the structured exception handling in both of these methods. If any errors are encountered, the exceptions are simply thrown back to the calling component for handling. No errors will be handled in these components.
Creating the Web Service
In Figure 1, you can see that the Data Tier is called from the Web service. You will now create the Web service project that calls the EmpData component that you just created.
1. In the Solution Explorer window, click the solution named EmpClient.
2. Right-click and on the shortcut menu, click Add, and then click New Project.
3. Select the ASP.NET Web service template and set the Name of this project to EmpWS.
4. Delete the Service1.asmx file from the project.
5. To add a new Web service file, on the Project menu, click Add Web service. Set the name of this new Web service to Employees.asmx.
6. Click the EmpWS project and add a reference to the EmpData project.
Now that you have created the Web service named Employees, you can create the two methods that will consume the dataset from the data component. You name these two methods the same name as the methods in the data component for consistency.
The GetData Method in the Web Service
The GetData method in the Web service creates a reference to the EmpData.Employees class. Once you have created this new object, invoke the GetData method on this object and return the dataset from this Web method.
As EmpData.dsEmps
Dim dc As EmpData.Employees
Try
dc = New EmpData.Employees()
Return dc.GetData
Catch
' Throw any exceptions back to client
Throw
End Try
End Function
Remember from the diagram in Figure 1 that the business rule component retrieves the data from this Web service. The reason you don't just create the typed data set in the Web service project is that you want the flexibility to use the data component directly from a Windows application if you are not going to be doing a true distributed application. So just by eliminating the Web service project, you can change the code in the business rule layer to talk directly to the data component instead of the Web service, and you do not have to change any other code.
The Update Method
The Update method in this Web service project simply passes the dataset that was passed in as an argument directly to the data component's Update method.
ByVal dsData As EmpData.dsEmps) As EmpData.dsEmps
Dim dc As EmpData.Employees
Try
dc = New EmpData.Employees()
dc.Update(dsData)
Catch
' Throw any exceptions back to client
Throw
End Try
Return dsData
End Function
Creating the Business Rules Component
Now it is time to bring all of the projects together by hooking up the business rule component to the Windows application, and having the business rule component make the call to the Web service to retrieve the data.
Follow the steps below to create the component that acts as the interface between the Windows application and the data tier.
1. In the Solution Explorer window, right-click the EmpClient solution, and on the shortcut menu, click Add, and then click New Project.
2. Select the Class Library template and set the Name of this new project to EmpBusRule.
3. Rename the Class1.vb file to clsEmployee.vb.
4. Change the name of the Public Class from Class1 to Employees.
5. To ensure that the solution compiles and to also build the Web service files needed for referencing, on the Build menu, click Build Solution.
6. Click the EmpBusRule project and add a Web Reference to the EmpWS.vsdisco file.
Note If you cannot set a reference to the vsdisco file, set a reference to the Employees.asmx file instead.
7. Expand the Web References folder in this project and rename the LocalHost item (or whatever the name of your Web Server is) to EmpService.
The GetData Method in the Business Rules Component
The GetData method in the business rule component simply accesses the Web service component to request the data from the data tier. Although this seems to be an indirect approach to getting the data, it allows us to create a truly distributed approach to our n-tier application.
Public Function GetData() As EmpService.dsEmps
Dim ws As EmpService.Employees
Try
ws = New EmpService.Employees()
Return ws.GetData
Catch
Throw
End Try
End Function
The Update Method in the Business Rules Component
The Update method is responsible for taking the dataset of changes, checking to make sure that the business rules are not violated, and then pushing the data back across the HTTP interface to the Web service component.
Public Function Update( _
ByVal dsData As EmpService.dsEmps) As EmpService.dsEmps
Dim ws As EmpService.Employees
Try
ws = New EmpService.Employees()
' Check business Rules
Me.Check(dsData)
' Update Data In Table
ws.Update(dsData)
Catch
' Throw any exceptions back to client
Throw
End Try
Return dsData
End Function
The Check Method in the Business Rules Component
The Check method is where you put in any appropriate business rules that you need to check prior to inserting or updating any rows in the dataset.
Public Sub Check(ByVal dsData As EmpService.dsEmps)
Dim strMsg As String
Dim row As EmpService.dsEmps.EmployeesRow
' Check business rules
For Each row In dsData.Employees.Rows
If row.RowState = DataRowState.Added Or _
row.RowState = DataRowState.Modified Then
If row.FirstName.Trim() = "" Then
strMsg &= "First Name must be filled in" & _
ControlChars.CrLf
End If
If row.LastName.Trim() = "" Then
strMsg &= "Last Name must be filled in" & _
ControlChars.CrLf
End If
If row.HireDate < row.BirthDate Then
strMsg &= "Hire Date must be greater
than Birth Date" & _
ControlChars.CrLf
End If
End If
Next
If strMsg <> "" Then
' Throw a new ApplicationException
' with our custom error message in it
Throw New ApplicationException(strMsg)
End If
End Sub
Notice that you should check the RowState property to see whether the row has been added or updated. You do not need to check the row if it has been deleted. During the Check method you can see the benefit of using Typed Datasets. Instead of referencing a column name through an index in a Dataset you have an actual property name. This enforces type safety and gives you an IntelliSense list of column names so you do not have to look them up in your database.
Consuming the Data from the Windows Application
Now that you have all of the components hooked up together, it is time to make the Windows application consume data from the business rules component. Follow the steps below to make this work.
1. In the Solution Explorer window, click the EmpClient project.
2. Add a reference to the EmpBusRule project.
3. Bring up the code for the form and add the Private mdsEmps variable, as shown in the code below.
4. Public Class EmpInfo
5. Inherits System.Windows.Forms.Form
6.
Private mdsEmps As EmpBusRule.EmpService.dsEmps
This member variable on this form is a typed dataset that represents the Employees table in the Northwind database. You use this variable to fill the DataGrid control on the employee form.
Loading Data into the DataGrid
Next, you need to create the routine to load the DataGrid. First, you add code to the form's Load event procedure.
1. Double-click the form to display the Load event procedure.
2. Add the following code:
3. Private Sub EmpInfo_Load( _
4. ByVal sender As System.Object, _
5. ByVal e As System.EventArgs) Handles MyBase.Load
6. GridLoad()
End Sub
7. Create the GridLoad procedure immediately below the Load event procedure.
8. Public Sub GridLoad()
9. Dim br As EmpBusRule.Employees
10.
11. Try
12. br = New EmpBusRule.Employees()
13.
14. ' mdsEmps is a typed dataset on this form
15. mdsEmps = br.GetData
16.
17. grdEmps.DataMember = "Employees"
18. grdEmps.DataSource = mdsEmps
19.
20. Catch exp As Exception
21. MsgBox(exp.Message)
22.
23. End Try
End Sub
The GridLoad procedure declares a new business rule object. It then uses the GetData method in the business rule object to assign the new typed dataset mdsEmps. You assign the table name to the DataMember and the dataset object to the DataSource property of the DataGrid control.
You should now be able to run this application, and if you have done everything correctly, the DataGrid should be loaded with employee data.
1. Set the EmpClient project as the Startup Project if it is not already.
2. Press F5 to run the application.
You should now see employee data in the list box that looks like Figure 2.
Updating Data from the DataGrid
You will now create the procedure under the Update button on the form to take any changes you make to the data in the grid and push them back to the data tier. Of course, you will first push the changes to the DataSet through the business rules component, which then sends the data through the Web service component, and then finally to the data tier component. The data tier component then connects up to the SQL Server and pushes the changes to the server.
Private Sub btnUpdate_Click( _
ByVal sender As System.Object, _
ByVal e As System.EventArgs) Handles btnUpdate.Click
Dim br As New EmpBusRule.Employees()
Dim dsChanges As New EmpBusRule.EmpService.dsEmps()
Dim strMsg As String
Try
If mdsEmps.HasChanges Then
dsChanges.Merge(mdsEmps.GetChanges())
MsgBox("Count = " & _
CStr(dsChanges.Employees.Rows.Count))
' Update the Data on the Server
dsChanges = br.Update(dsChanges)
MsgBox("Data Has Been Updated Successfully")
' You can either merge the changes back
' in and accept the changes, or you can
' reload the data from the table. I prefer
' reloading as it gets all the other
' changes by all other users.
'mdsEmps.Merge(dsChanges)
'mdsEmps.AcceptChanges()
' If everything is OK, refresh all data
' from the web service.
GridLoad()
Else
MsgBox("No changes have been made
to the data")
End If
Catch exp As ApplicationException
MsgBox(exp.Message)
Catch exp As Exception
MsgBox(exp.Message)
End Try
End Sub
The first part of this event procedure checks to see whether any changes have even been made to the DataSet. If they have, you get the changed data rows by using the GetChanges method of the DataSet class. This will return just those rows that were changed in the DataGrid.
Once you have this short list of rows from the dataset you can submit that to the Update method of the business rule component. The business rule component then sends it to the Web service component, which sends it on to the data tier component, and finally updates SQL Server. If any changes are made to the rows in the dataset (such as a TimeStamp field updating, or an identity field updating), these rows are passed back to this procedure. You can then either merge the data back into the main dataset, or you could simply reload the entire dataset directly from the database (going through the components of course).
When attempting to submit the changes to the back end, there could be a business rule that is violated. For example, if someone deletes the first name of an employee, the business rule that checks for the existence of the first name in a row of data will fail. This will be thrown as an ApplicationException object. You should check for this type of exception first, then display the error message returned, as that will be the description of the business rule or rules that are in violation.
The last thing you have to check for is any generic exceptions. For example, the database server might be down, and thus a regular exception might be thrown. Or maybe a concurrency exception is thrown because you updated a row and another user updated a row just before you did.
What's Different from Visual Basic 6.0?
Although the concepts for designing an n-tier application are pretty much the same as they have always been, the implementation is quite different. You should find that the amount of code you have to write is significantly reduced due to the advancements in Web services and ADO.NET.
Summary
In this document, you learned how to put together an n-tier application. Although you are shown just one of the many ways you could accomplish this, the format used here is very simple and easy to create. While the component you build here may be created on one machine, you can easily move the components from one machine to another and scale this solution using .NET Remoting and Web services. Whether you choose a logical or a physical implementation for your applications, you should always strive to develop your application using separate components for each process.
Subscribe to:
Posts (Atom)